Provisioning Cloud Infrastructure
The desktop application makes it easy to provision cloud infrastructure. You can create all the infrastructure you need to run OmicsPipelines on Amazon Web Services or Google Cloud Platform through a view simple forms. Select your cloud provider below to get started.
- Amazon Web Services
- Google Cloud Platform
Amazon Web Services
In Amazon Web Services you will need to provision two sets of resources, one for infrastructure needed to run pipelines, and the other in order to run the OmicsPipelines dashboard web application.
We call these the Core Environment and the Server. You can provision as many Servers as you like, but you will need to provision at least one Core Environment to create a Server. See the View Infrastructure page on details about these environments and how OmicsPipelines uses them.
Selecting a Region
Select a region from the dropdown menu at the top of the page. This is the region where your Core Environment will be provisioned, and where your
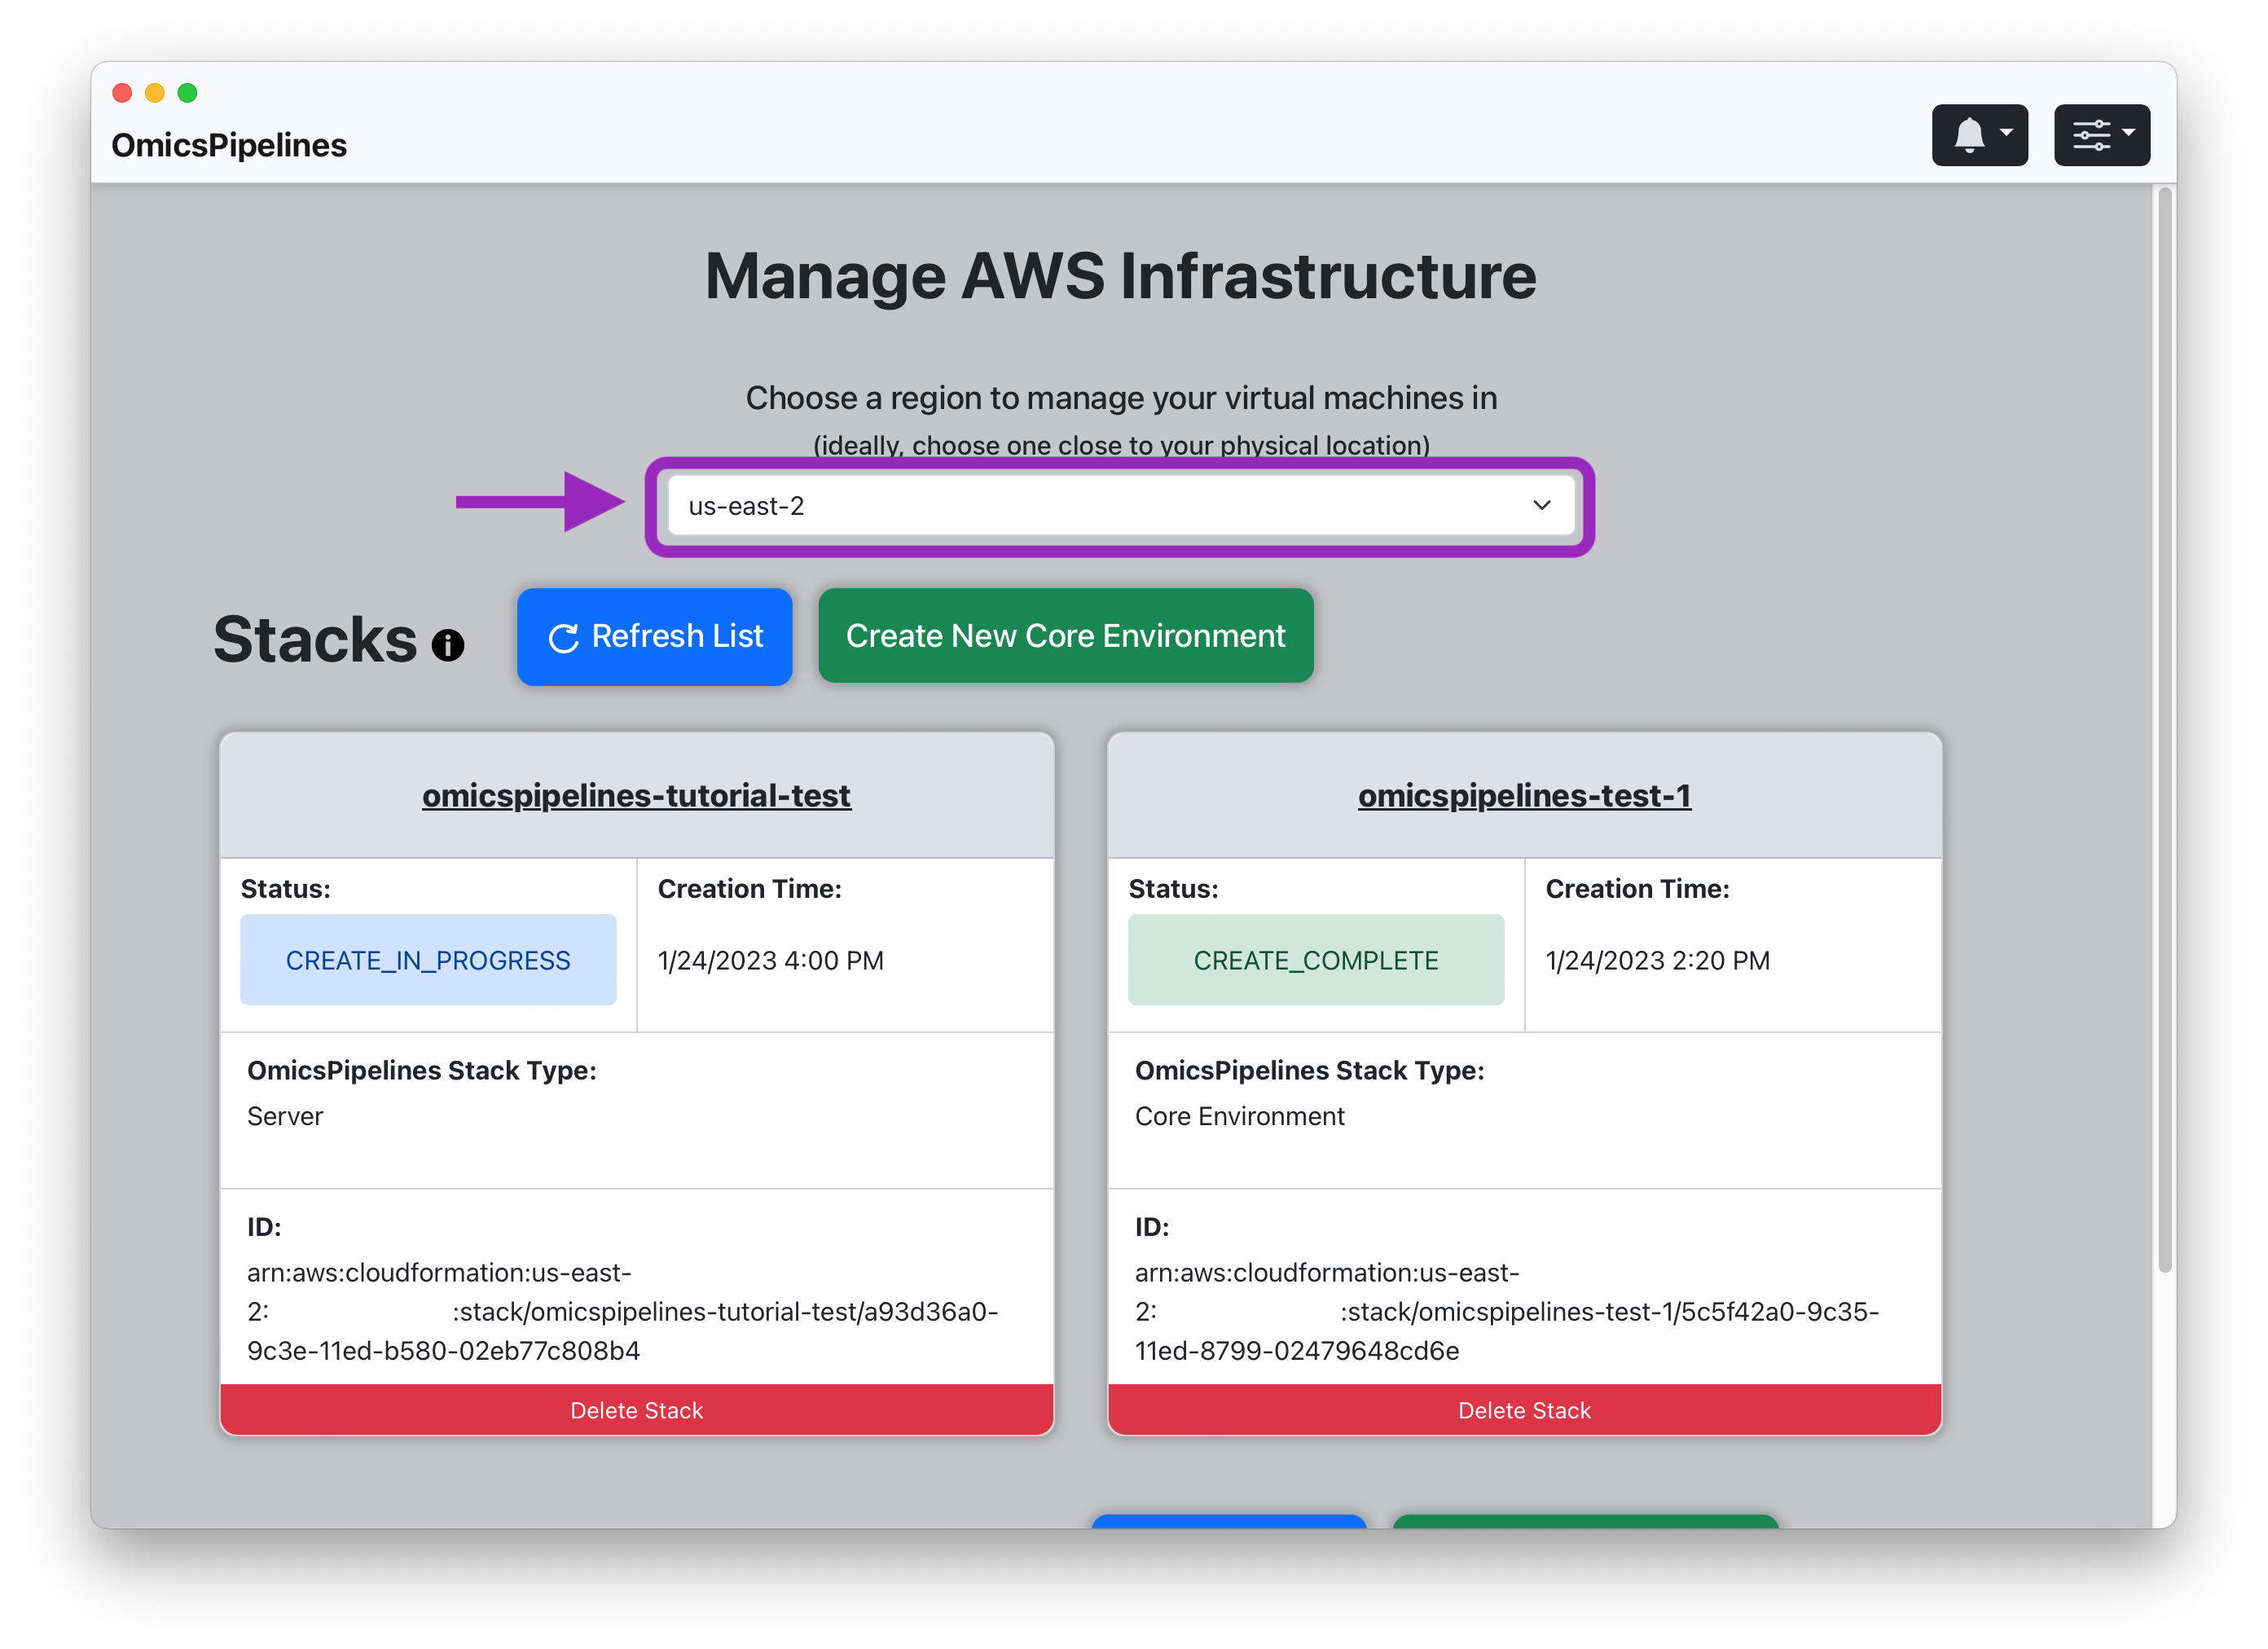
The region you select determines where your virtual machine will be located. We recommend using the region closest to you.
The region you select also determines the price you pay for your infrastructure. Ideally, you should select a region that is close to your location.
See the AWS documentation on regions for more information.
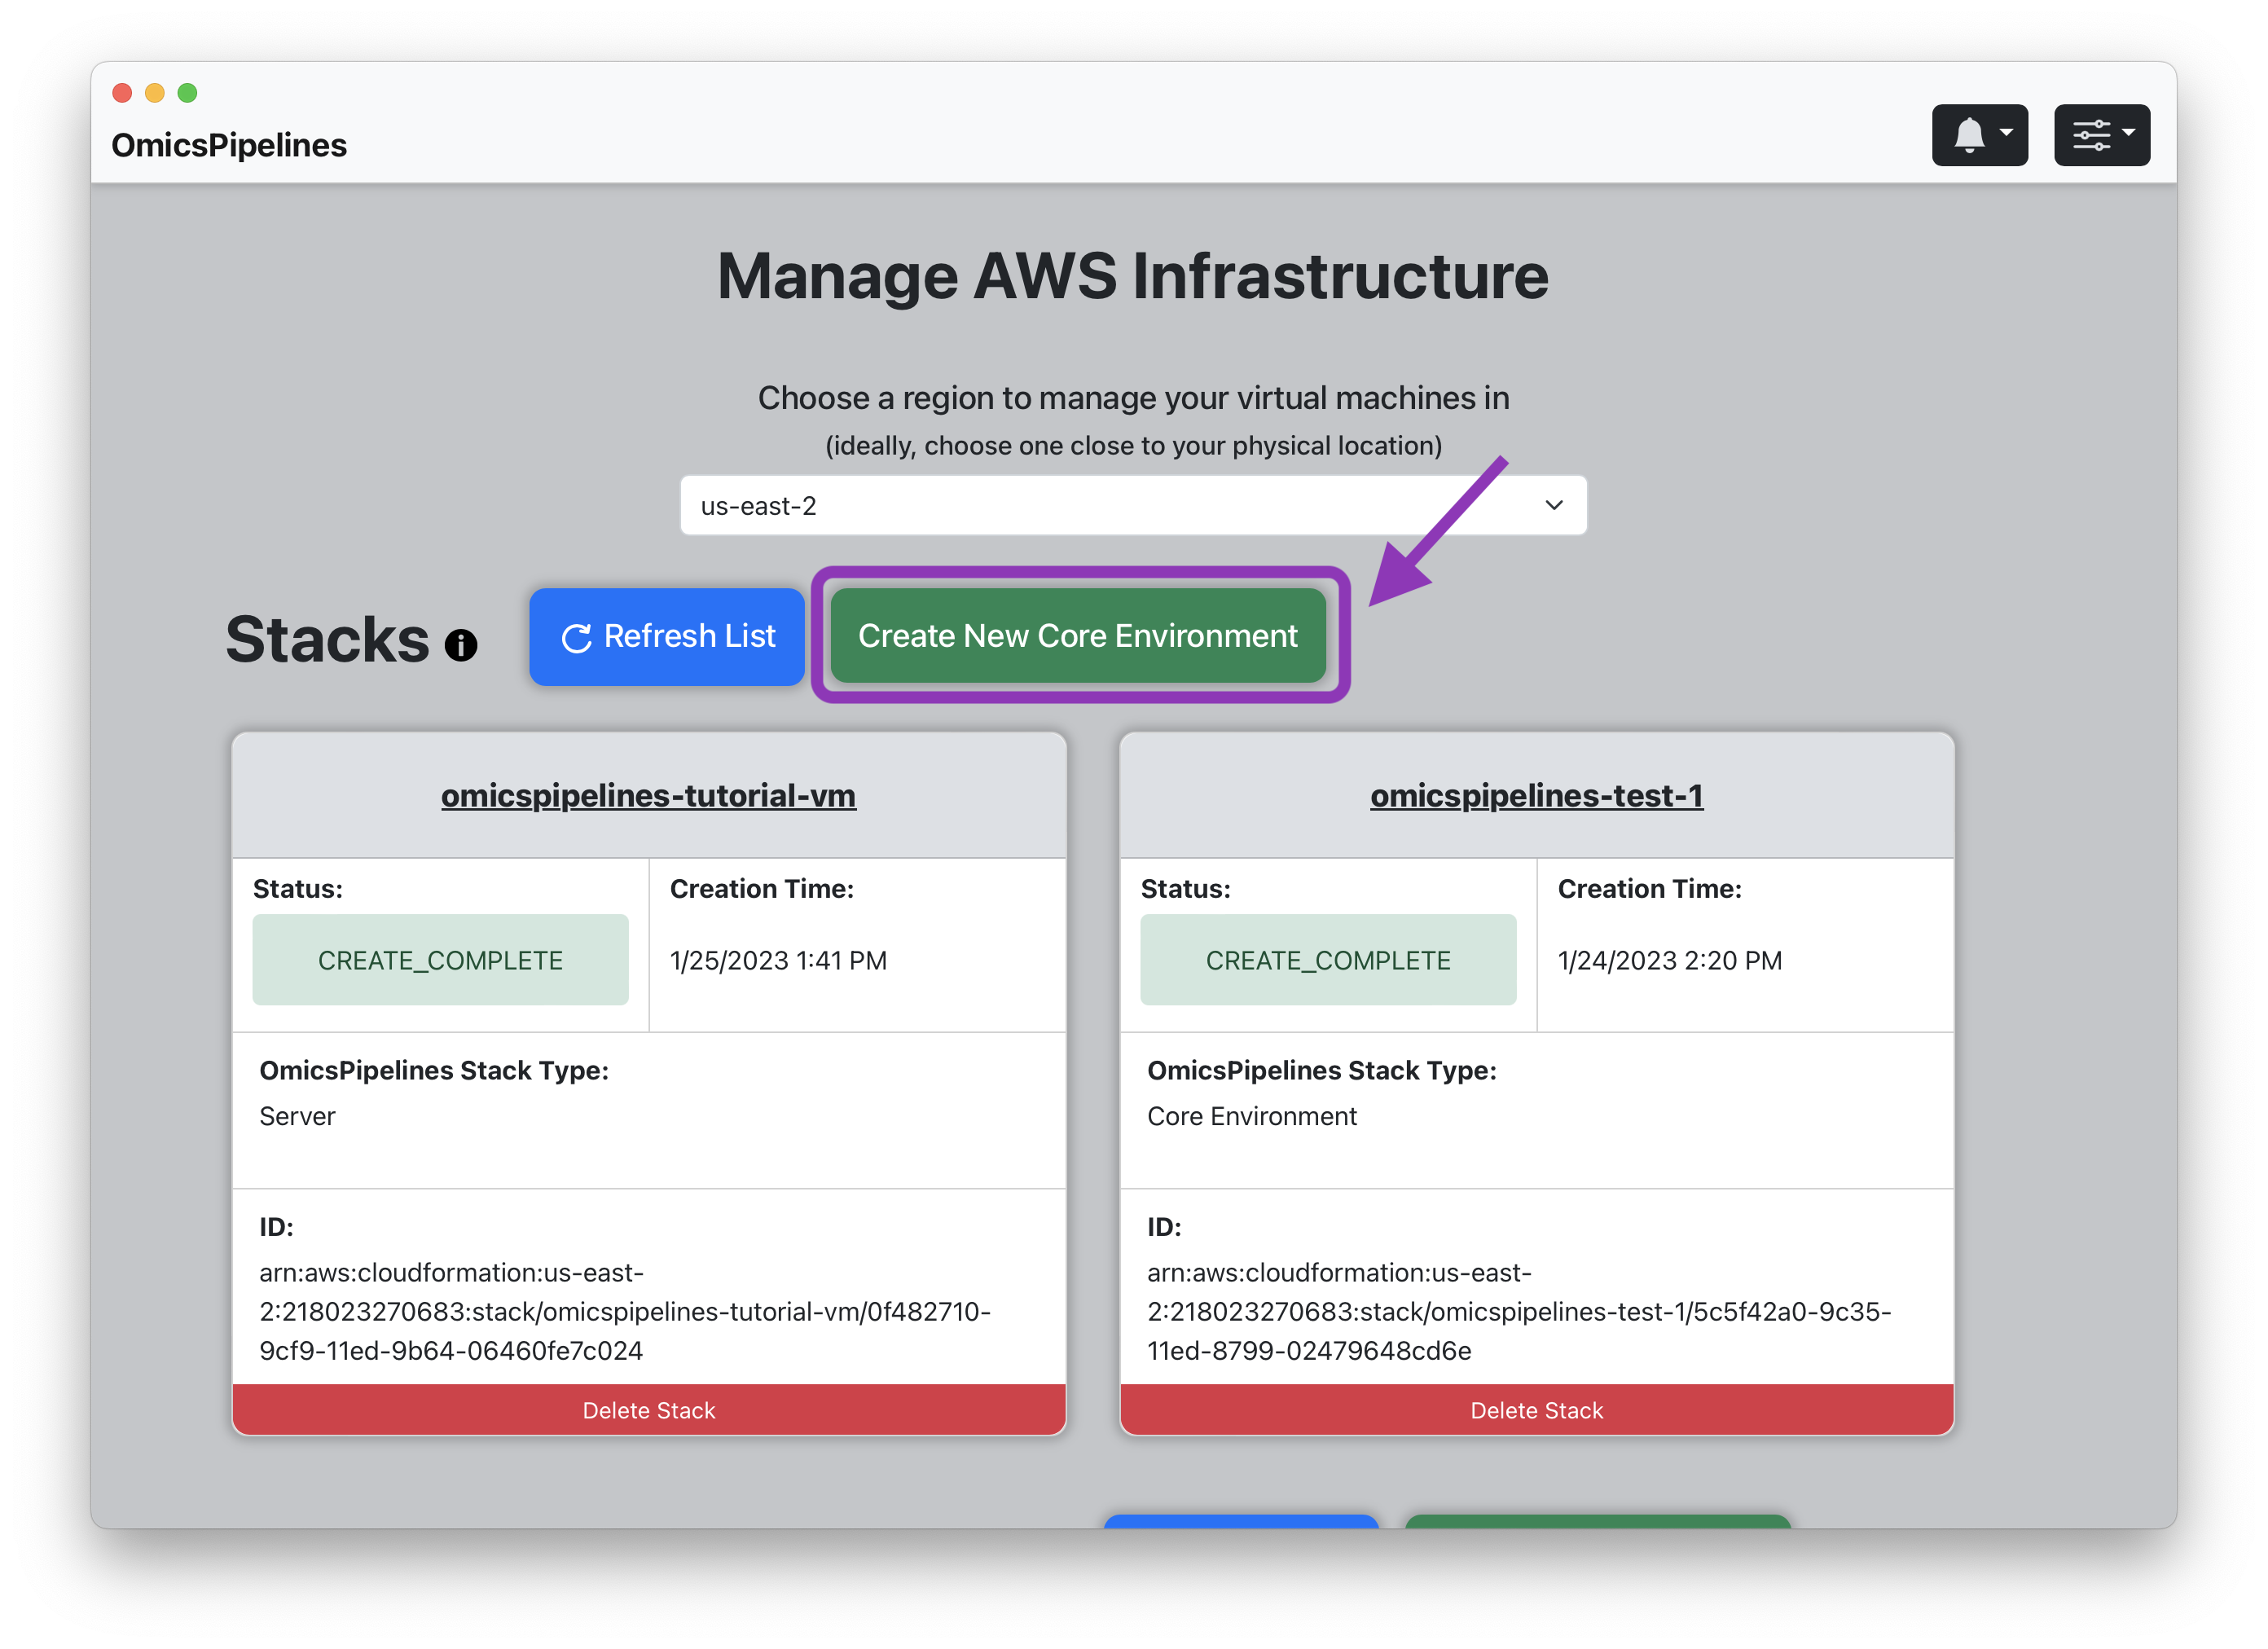
Creating a Core Environment
- Click the "Create New Core Environment" button. This will open a "Create Core Environment" modal.
- Stack Name - Enter a name for your Core Environment. This name will be used to identify your Core Environment in the stack list shown on the View Infrastructure page.
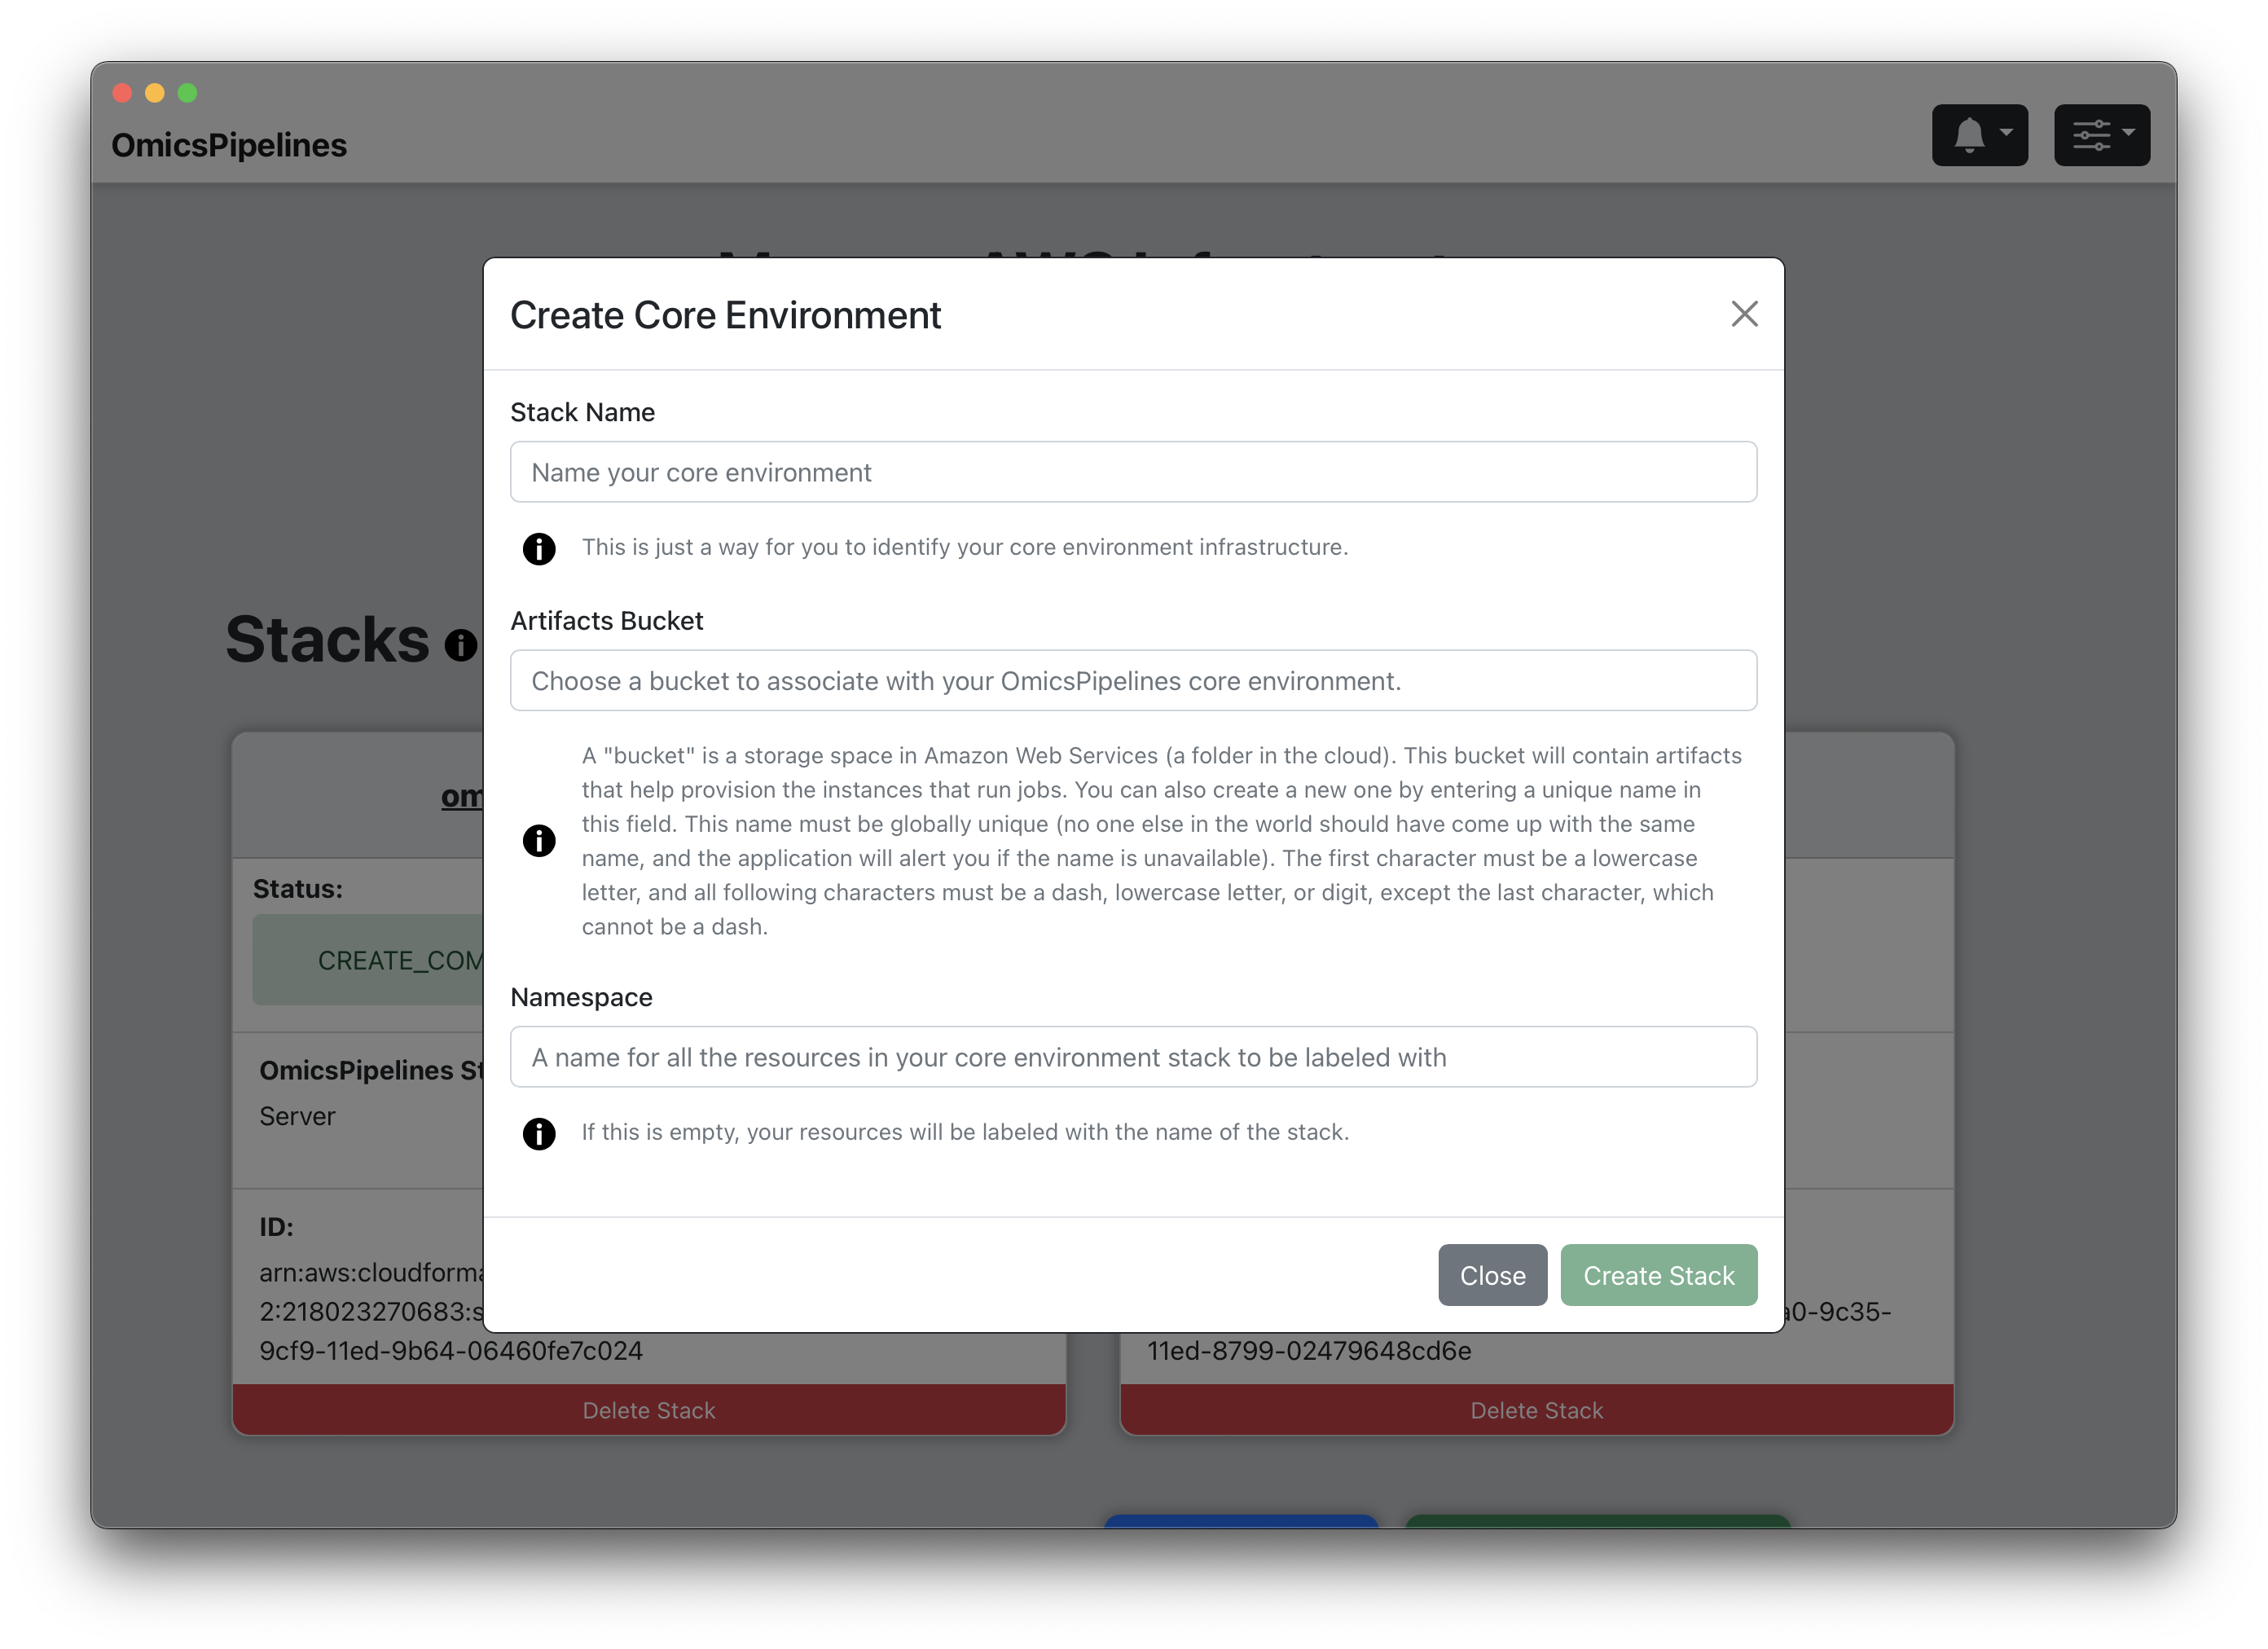
- Artifacts Bucket - Enter a name for the S3 bucket that will be used to store the resources needed to launch your core environment. This bucket will be created for you if it does not already exist.
If you have not created a bucket yet, you can do so in this field. If this bucket does not exist, OmicsPipelines will create it for you. Bucket names share a global namespace, meaning that this name must be unique across all users and organizations using Amazon Web Services, so you should select a name that is not already in use. OmicsPipelines will alert you if the name you choose is not available.
-
Namespace - Enter a namespace for your Core Environment. This is purely optional, but it can be useful if you have multiple Core Environments and want to distinguish them. The infrastructure you create will be tagged with the namespace.
-
Create Stack - Click the "Create Stack" button to create your Core Environment. This will take a few minutes to complete. Once created, the status text in the stack in the stack list will change from CREATE_IN_PROGRESS to CREATE_COMPLETE.
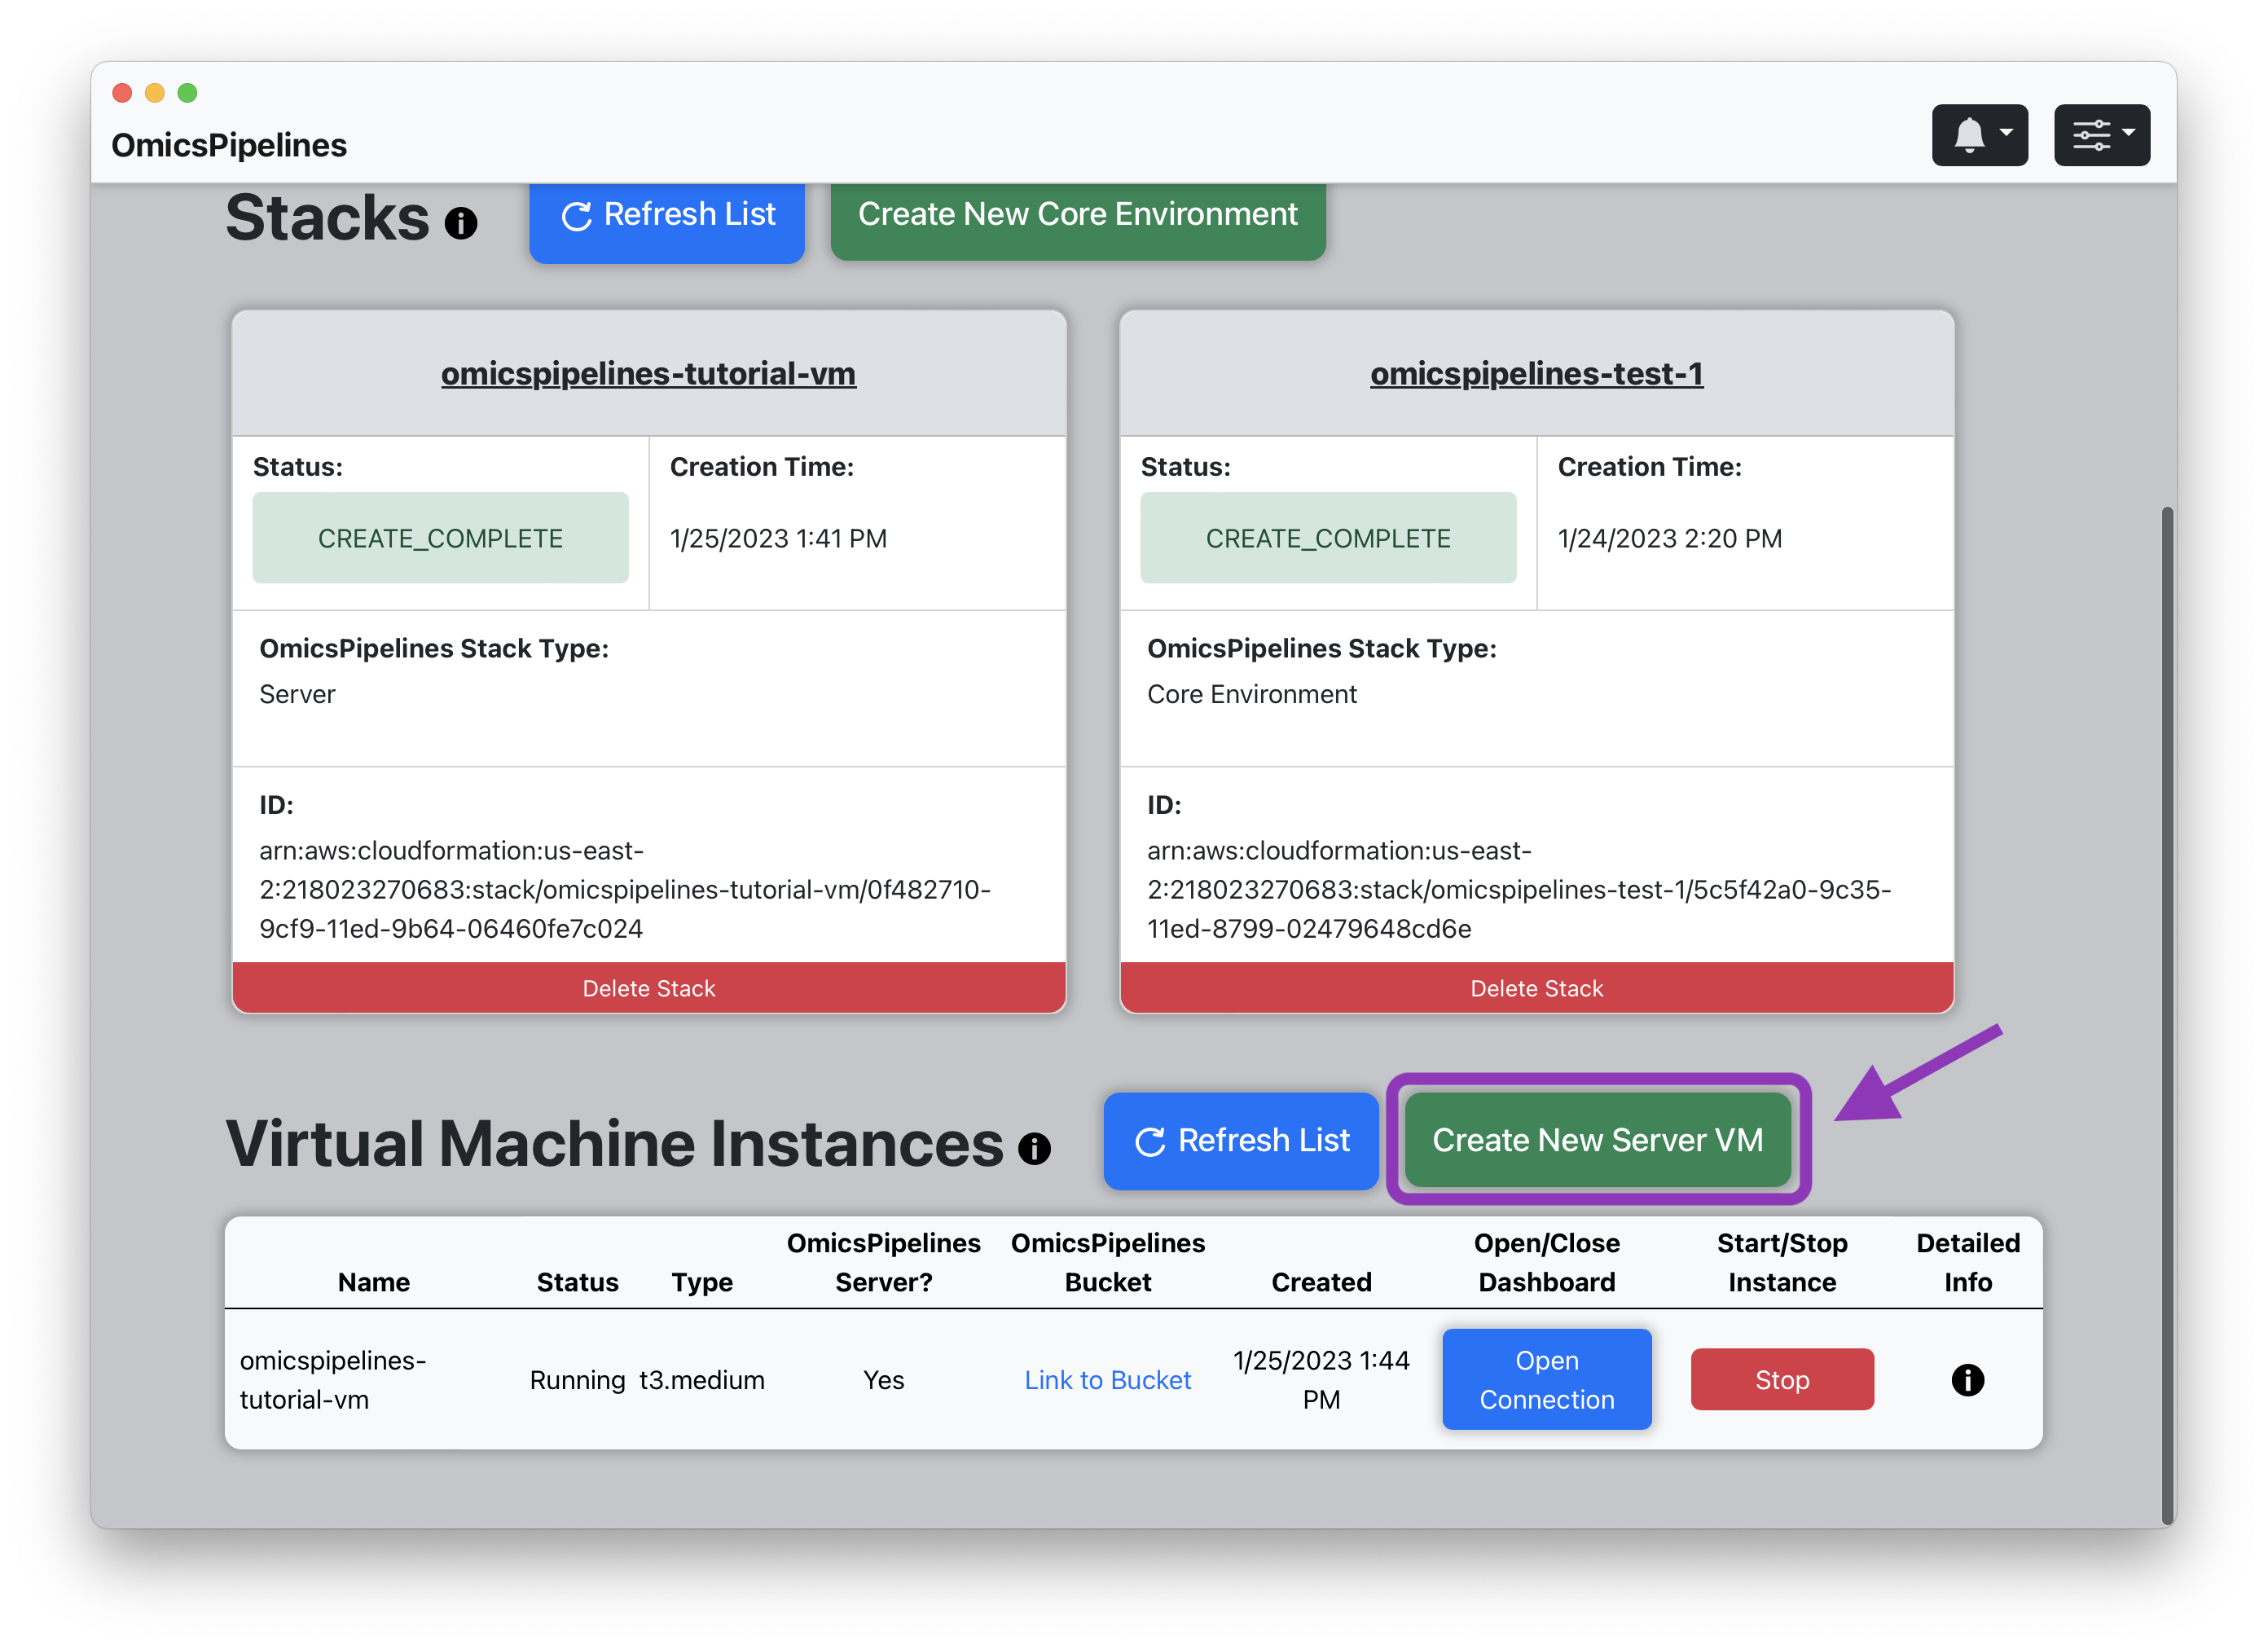
Creating a Server
- Click the "Create New Server VM" button. This will open a "Create Instance" modal.
-
Instance Name - Enter a name for your virtual machine. This name will be used to identify your virtual machine in the application and Amazon Web Services console.
-
Instance Type - Select a machine type from the dropdown menu. The machine type determines the amount of CPU and memory available to your virtual machine. For more information on machine types, see the EC2 Instance Types page.
For most applications, the default machine (t3.medium) type is more than sufficient for OmicsPipelines, but it is
beneficial to select a machine type with more cores and memory if you are running a large number of samples. Although
most machine types are present in the list, you should never need to go above 16 vCPUs (computer cores) and 128 GB of
RAM (memory).
- Instance Disk Size - Select the size of your boot disk. This is the disk that will be used to store all the data and software required to run OmicsPipelines.
Although 10 GB is the default disk size that OmicsPipelines fills in, this number is a minimum, and if you plan to run a large number of samples and/or run pipelines a number of times, you should select a larger disk size (100 GB).

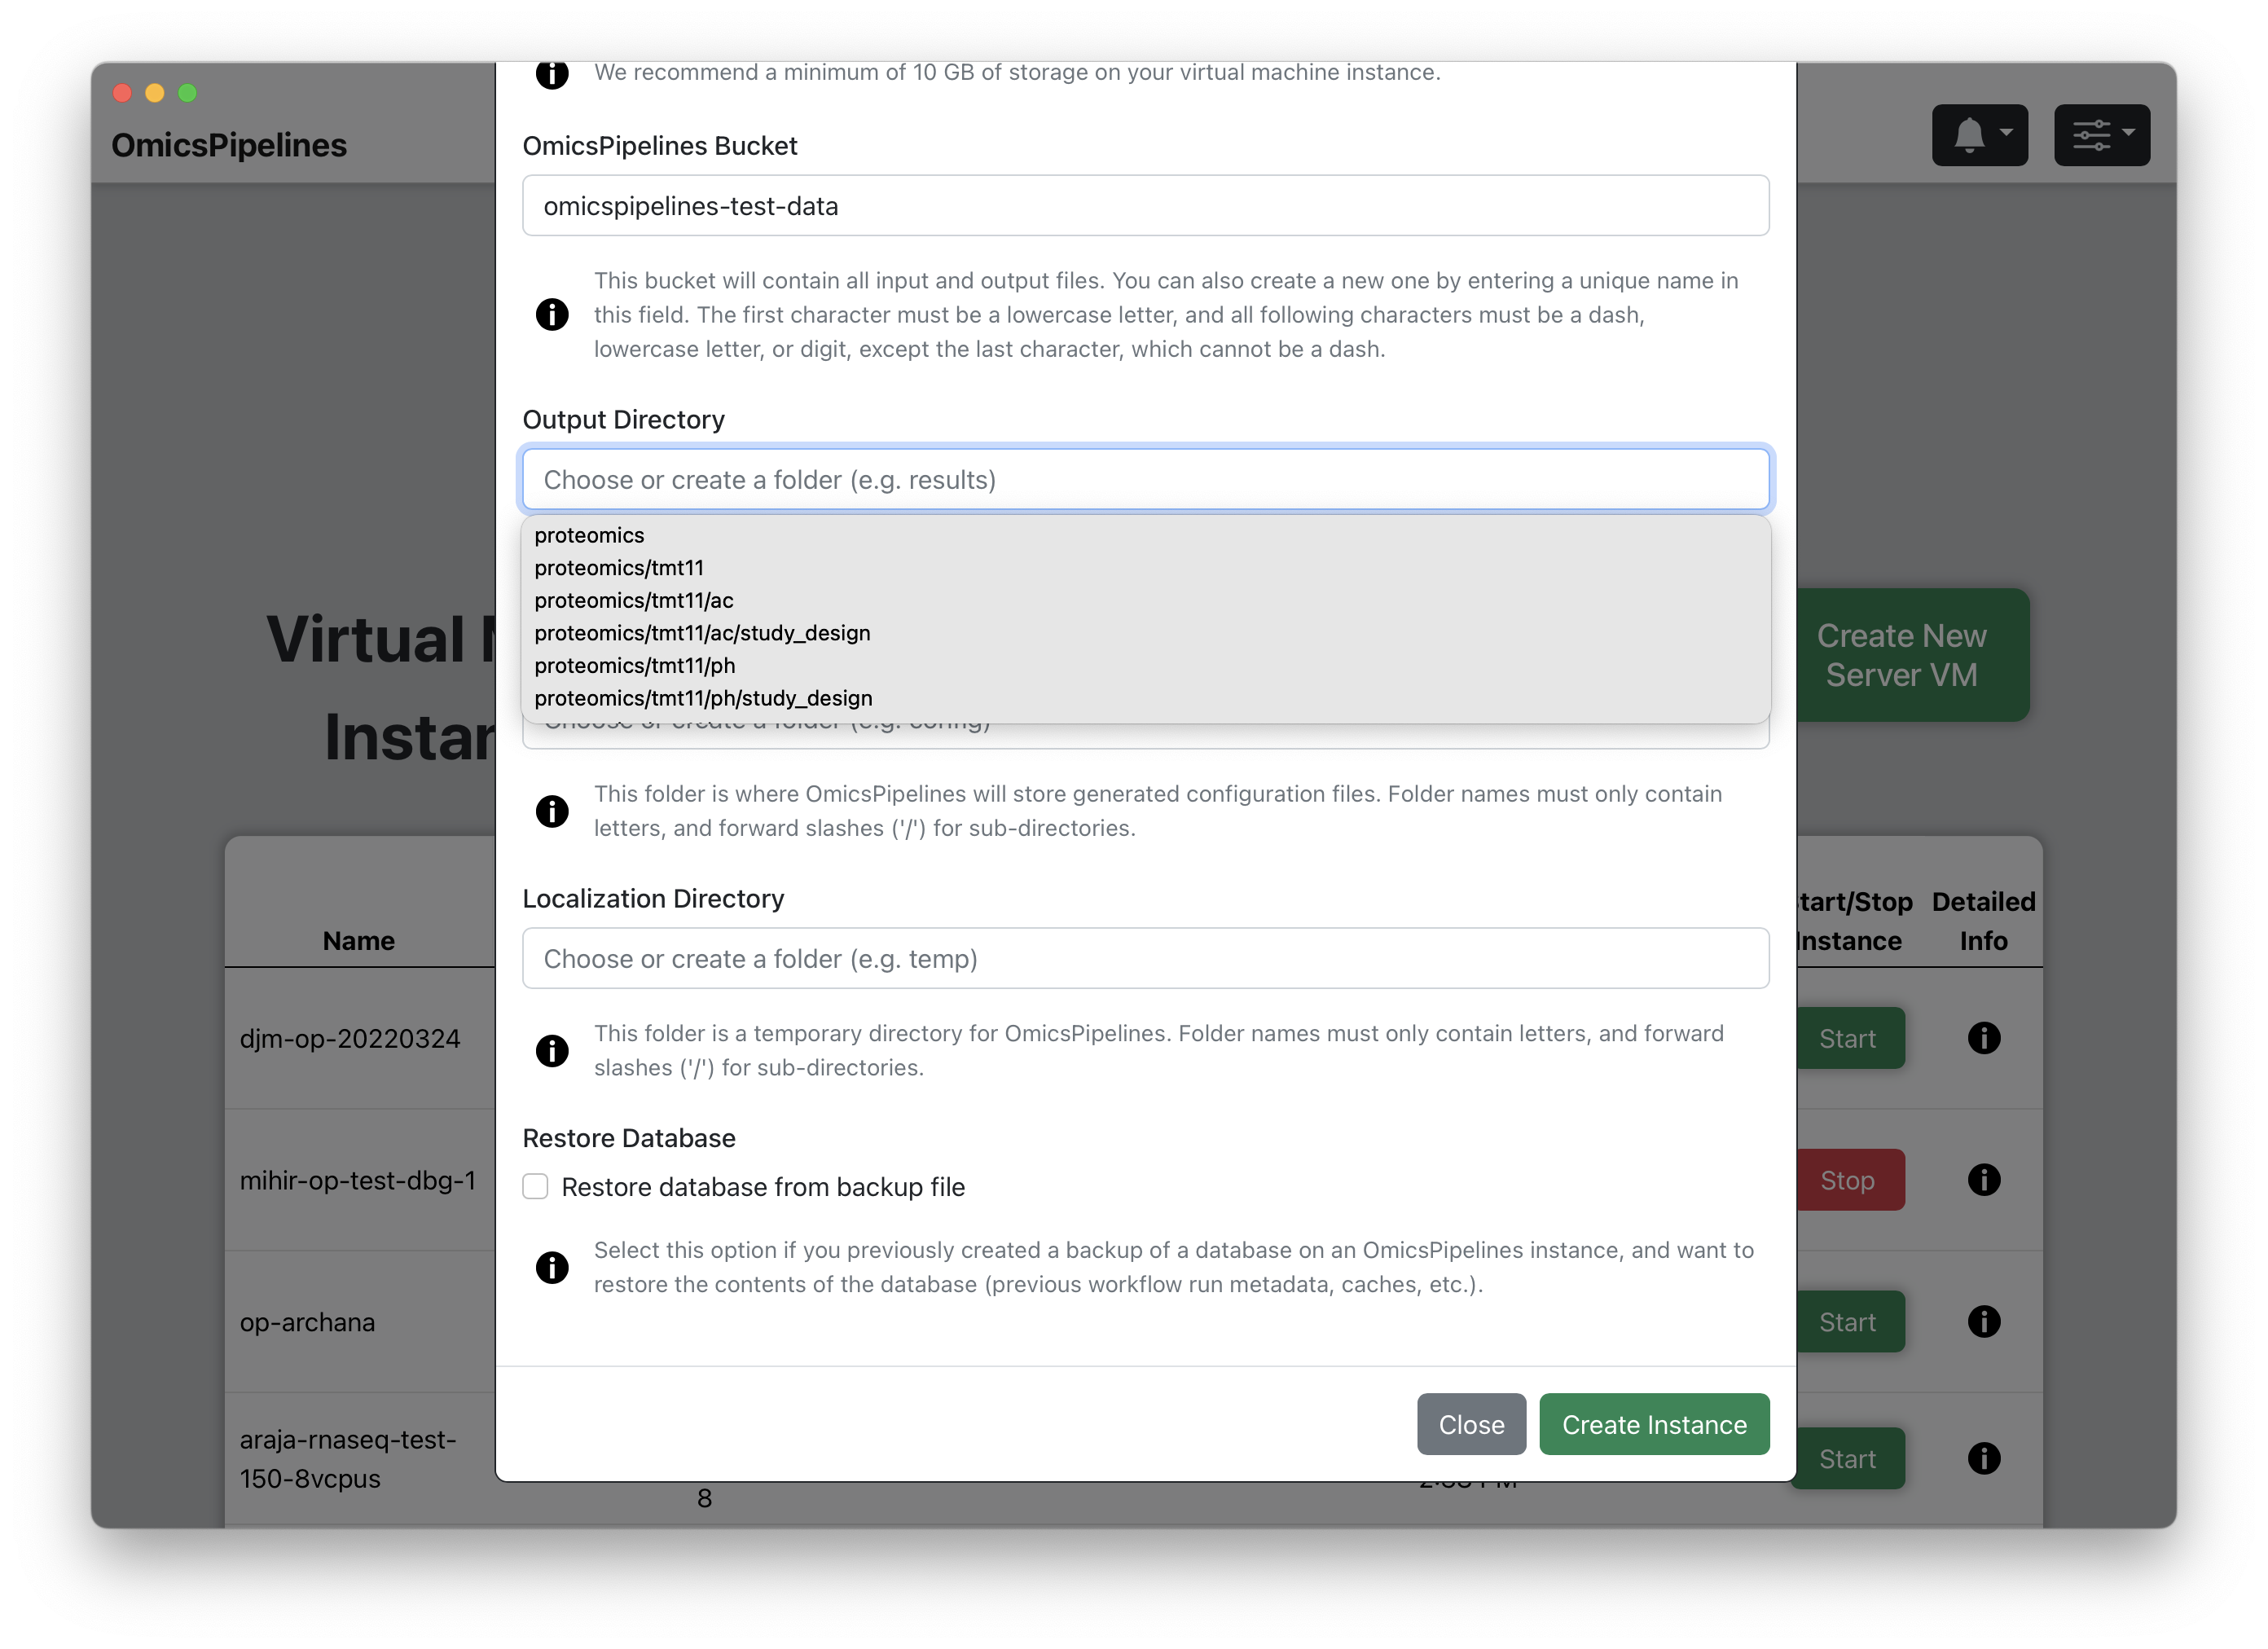
- OmicsPipelines Bucket - Select a bucket to associate with your virtual machine. You can read more about what cloud storage/buckets are on the Amazon Web Services docs or on the Overview page of the OmicsPipelines documentation. This is the bucket that will be used to store all the configurations created by OmicsPipelines and data created by each pipeline run.
If you have not created a bucket yet, you can do so in this field. If this bucket does not exist, OmicsPipelines will create it for you. Bucket names share a global namespace, meaning that this name must be unique across all users and organizations using Amazon Web Services, so you should select a name that is not already in use. OmicsPipelines will alert you if the name you choose is not available.
-
Output Directory - Choose a folder name for the outputs of the pipeline runs, such as
outputThis is the folder that will be created in the bucket you selected in the previous step. This folder will contain all the outputs of the pipelines, including all intermediate steps. The name of the folder can also be nested folder, e.g.folder1/folder2/output. If the bucket already exists, OmicsPipelines will suggest existing folders that you can use. -
Configuration Directory - Choose a folder name for the configuration files that OmicsPipelines generates, such as
config. This is used to allow you to easily re-run the same pipeline with the same configuration. OmicsPipelines also generates a file that you can use to run Cromwell pipelines without using OmicsPipelines. The name of the configuration folder can also be a nested folder, e.g.folder1/folder2/config. If the bucket already exists, OmicsPipelines will suggest existing folders that you can use. -
Localization Directory - Choose a folder name for temporary files generated during pipeline runs, such as
temp. This folder is rarely used, if ever, and will never contain any data that you need to keep. The name of the temporary folder can also be a nested folder, e.g.folder1/folder2/temp. If the bucket already exists, OmicsPipelines will suggest existing folders that you can use. -
(Optional) Restore Database - If you have a backup of your OmicsPipelines virtual machine's database, click on the checkbox to restore it to this virtual machine when it is created. This will allow you to restore your OmicsPipelines dashboard to a previous state. See the Manage Infrastructure page of the OmicsPipelines documentation for more information on backing up your OmicsPipelines virtual machine instance.
(Optional) Select Bucket - Select a bucket from the dropdown that contains a backup of your OmicsPipelines database.
(Optional) Select File - Select a file that contains a backup of your OmicsPipelines database. The list is automatically filtered to only show files that end with
.sql.gz, which is the file extension used by OmicsPipelines for database backups.
- Creating Instance - Click the "Create Instance" button to create your virtual machine. This will take a few minutes to complete. Once it is complete, you will receive a notification and the "Open Connection" button will be enabled.
If you are creating a new bucket, it may take a few minutes for the bucket to be created. If you are restoring an OmicsPipelines virtual machine from a database backup, especially one that was especially large, it will take a few minutes for the database to be restored. You may still connect to your virtual machine while these processes are running, but you may not see the complete list of your previous pipelines.
Google Cloud Platform
In Google Cloud Platform, you only need to create a virtual machine to run the required software. See the Overview page of the OmicsPipelines documentation for more information on what a virtual machine is and how OmicsPipelines uses it.
Creating a virtual machine
- Select a region from the dropdown menu in the top right corner of the page.
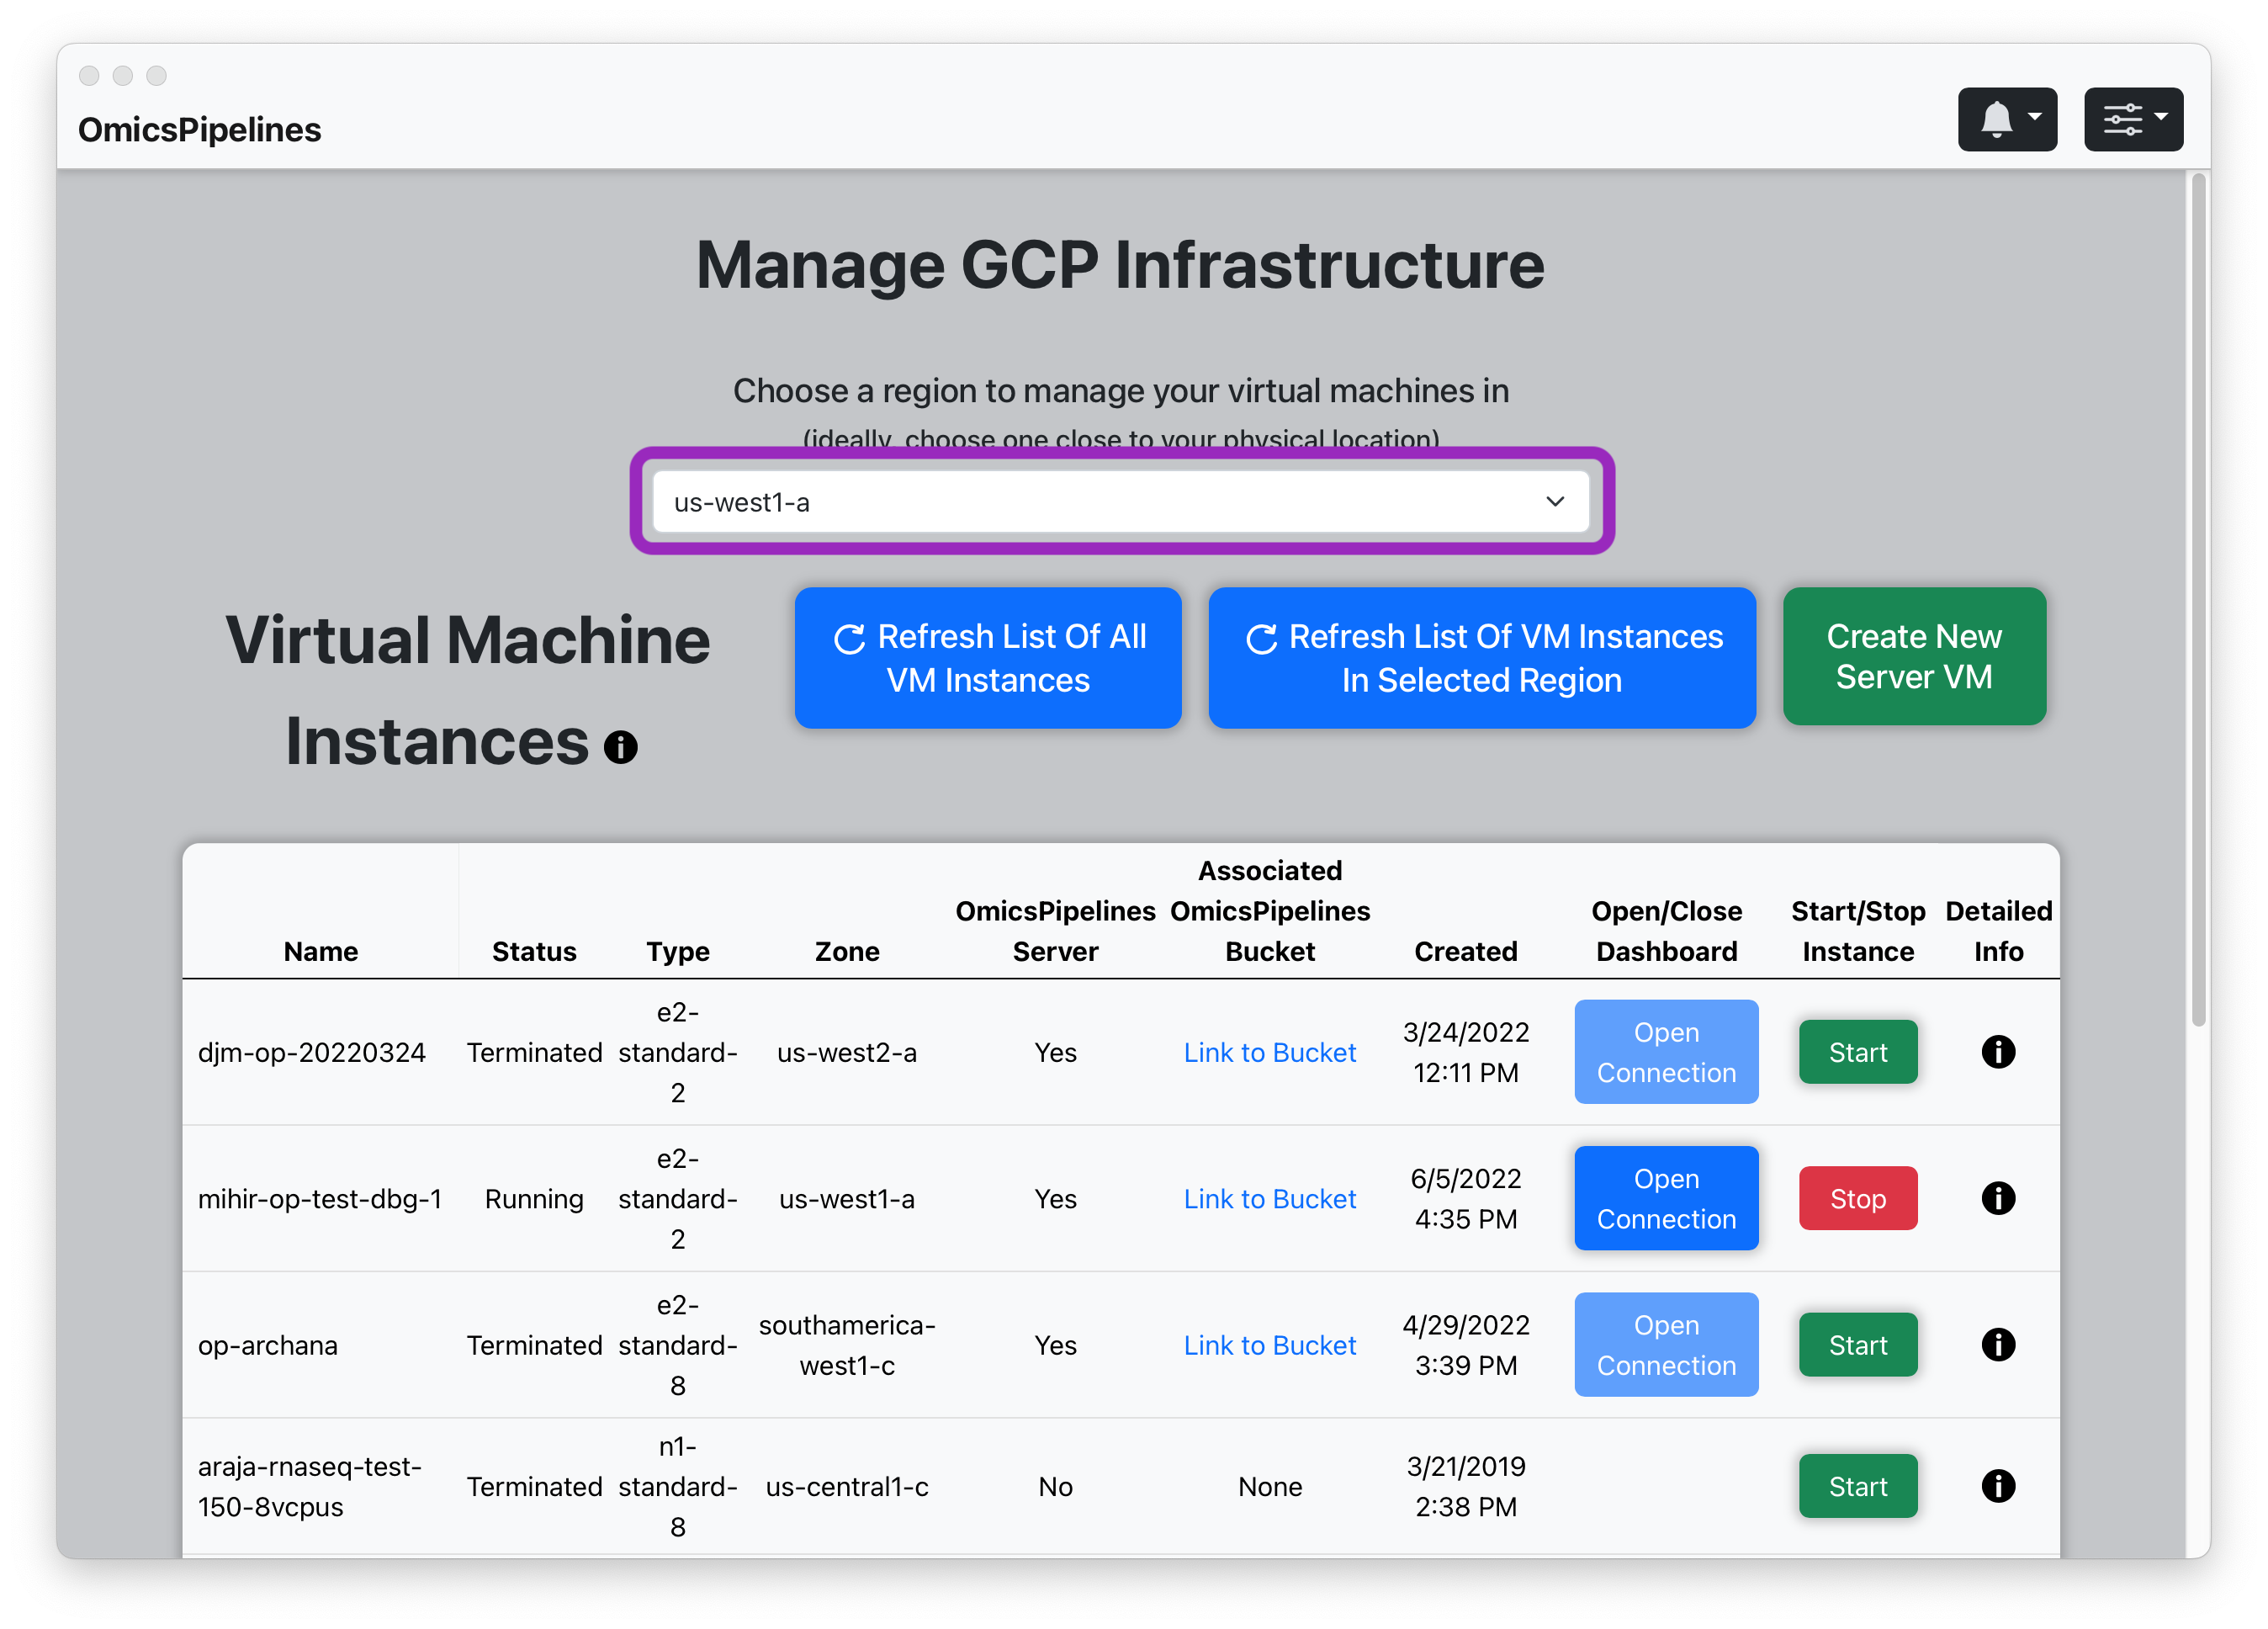
The region you select determines where your virtual machine will be located. The region you select also determines the price you pay for the virtual machine. Ideally, you should select a region that is close to your location.
For more information on pricing, see the Pricing page of the Google Cloud documentation.
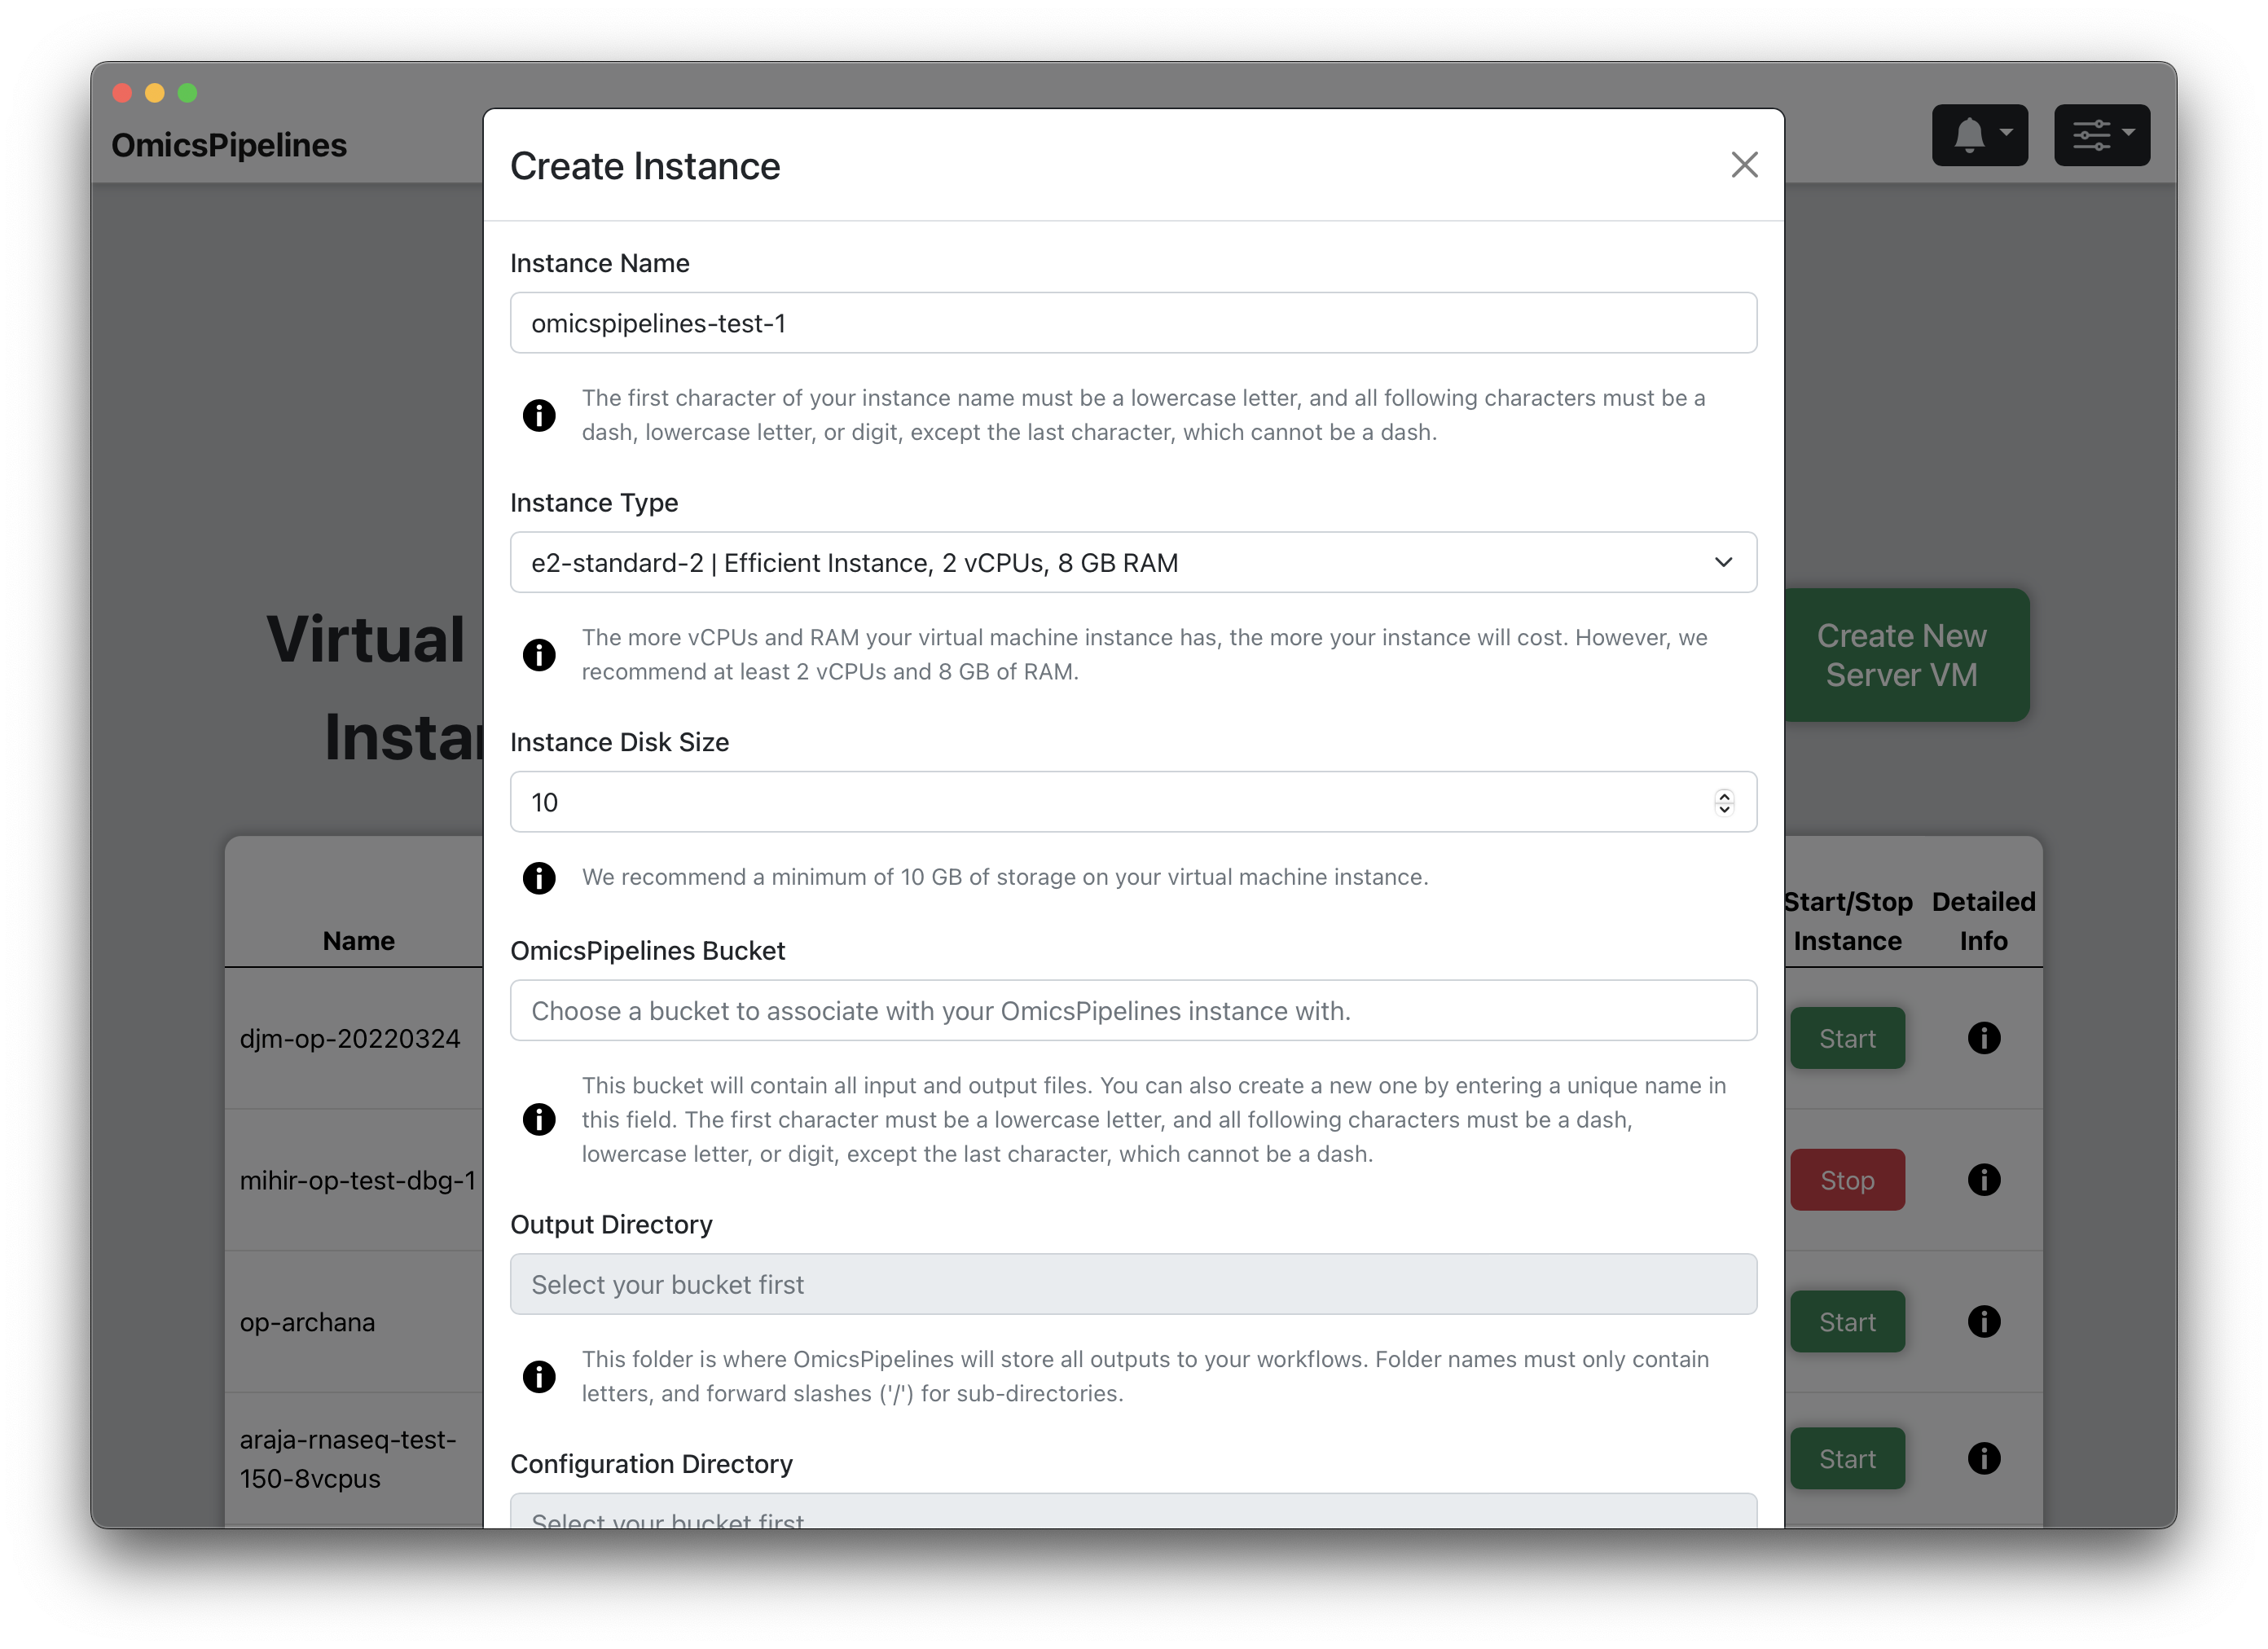
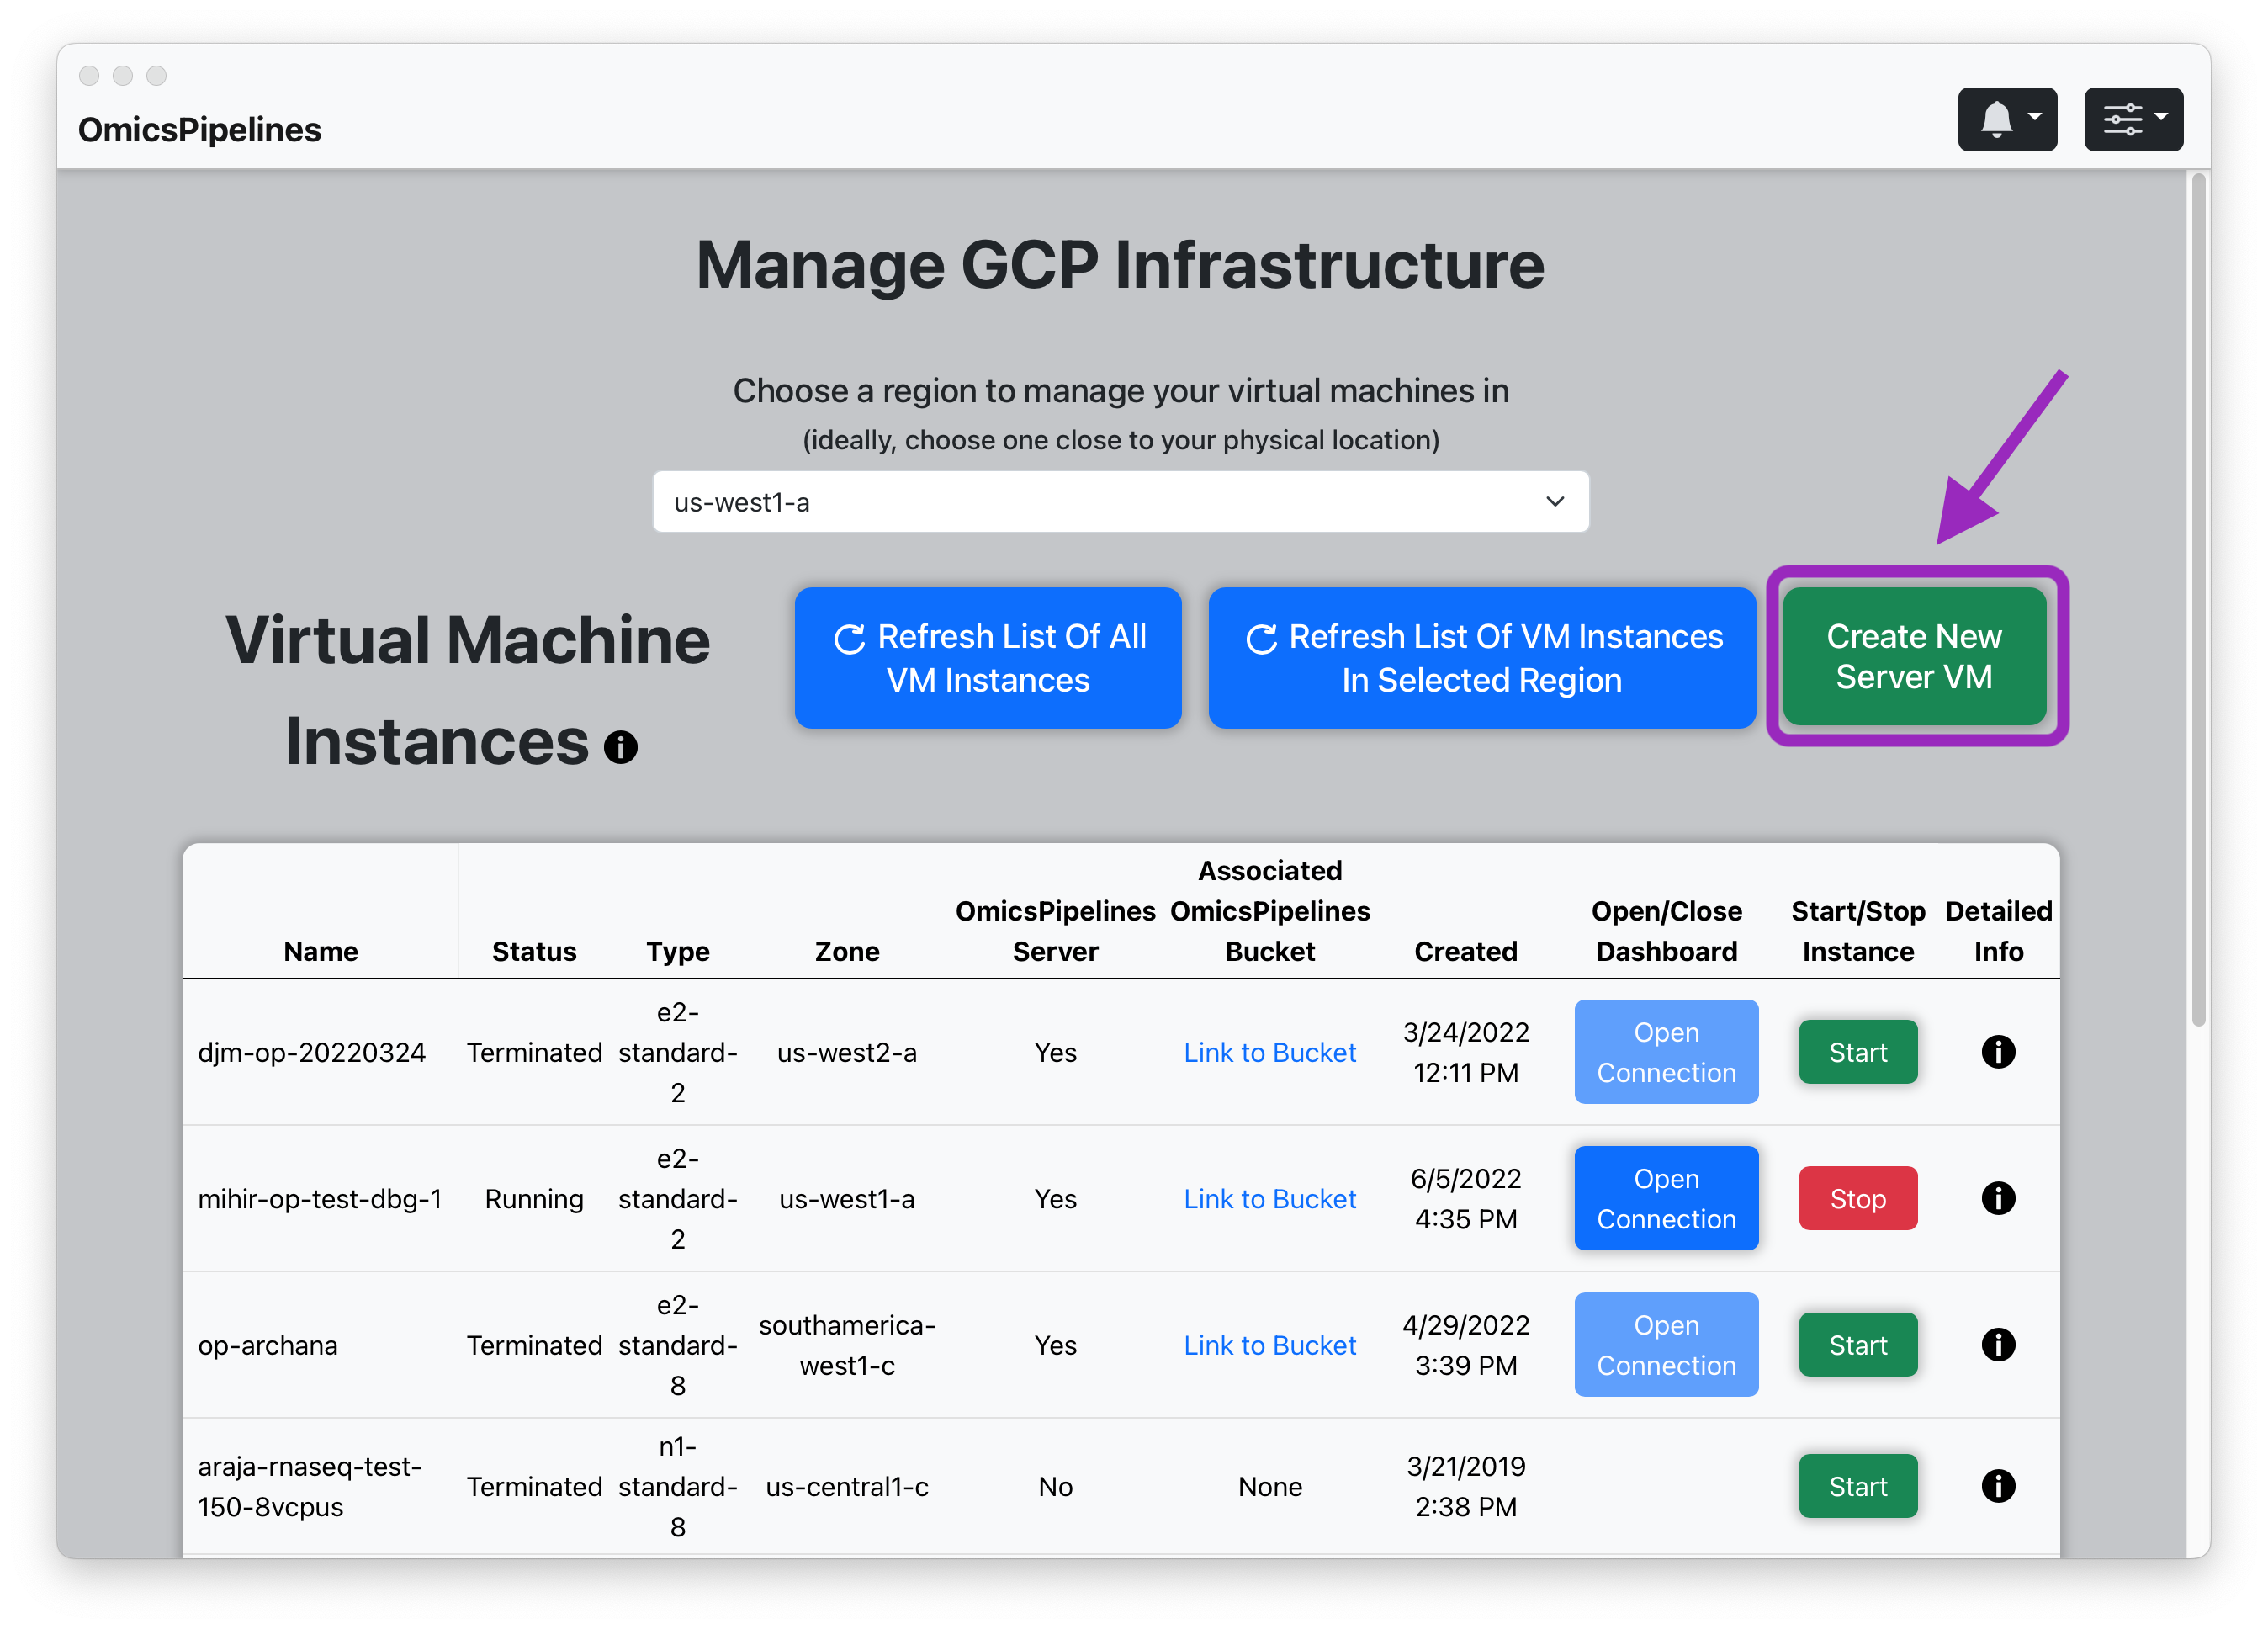
- Click the "Create New Server VM" button. This will open a "Create Instance" modal.
-
Instance Name - Enter a name for your virtual machine. This name will be used to identify your virtual machine in the application and Google Cloud Platform console.
-
Instance Type - Select a machine type from the dropdown menu. The machine type determines the amount of CPU and memory available to your virtual machine. For more information on machine types, see the Machine Types page.
For most applications, the default machine (e2-standard-2) type is more than sufficient for OmicsPipelines, but it is beneficial to select a machine type with more cores and memory if you are running a large number of samples. Although there are a number of machine types present in the list, in most cases there generally isn't much benefit to selecting a machine with more than 16 vCPUs (computer cores) and 128 GB of RAM (memory).
- Instance Disk Size - Select the size of your boot disk. This is the disk that will be used to store all the data and software required to run OmicsPipelines.
Although 10 GB is the default disk size that OmicsPipelines fills in, this number is a minimum, and if you plan to run a large number of samples and/or run pipelines a number of times, you should select a larger disk size (100 GB).
- OmicsPipelines Bucket - Select a bucket to associate with your virtual machine. You can read more about what cloud storage/buckets are on the Google Cloud docs or on the Overview page of the OmicsPipelines documentation. This is the bucket that will be used to store all the configurations created by OmicsPipelines and data created by each pipeline run.
If you have not created a bucket yet, you can do so in this field. If this bucket does not exist, OmicsPipelines will create it for you. Bucket names share a global namespace, meaning that this name must be unique across all users and organizations using Google Cloud Platform, so you should select a name that is not already in use. OmicsPipelines will alert you if the name you choose is not available.
-
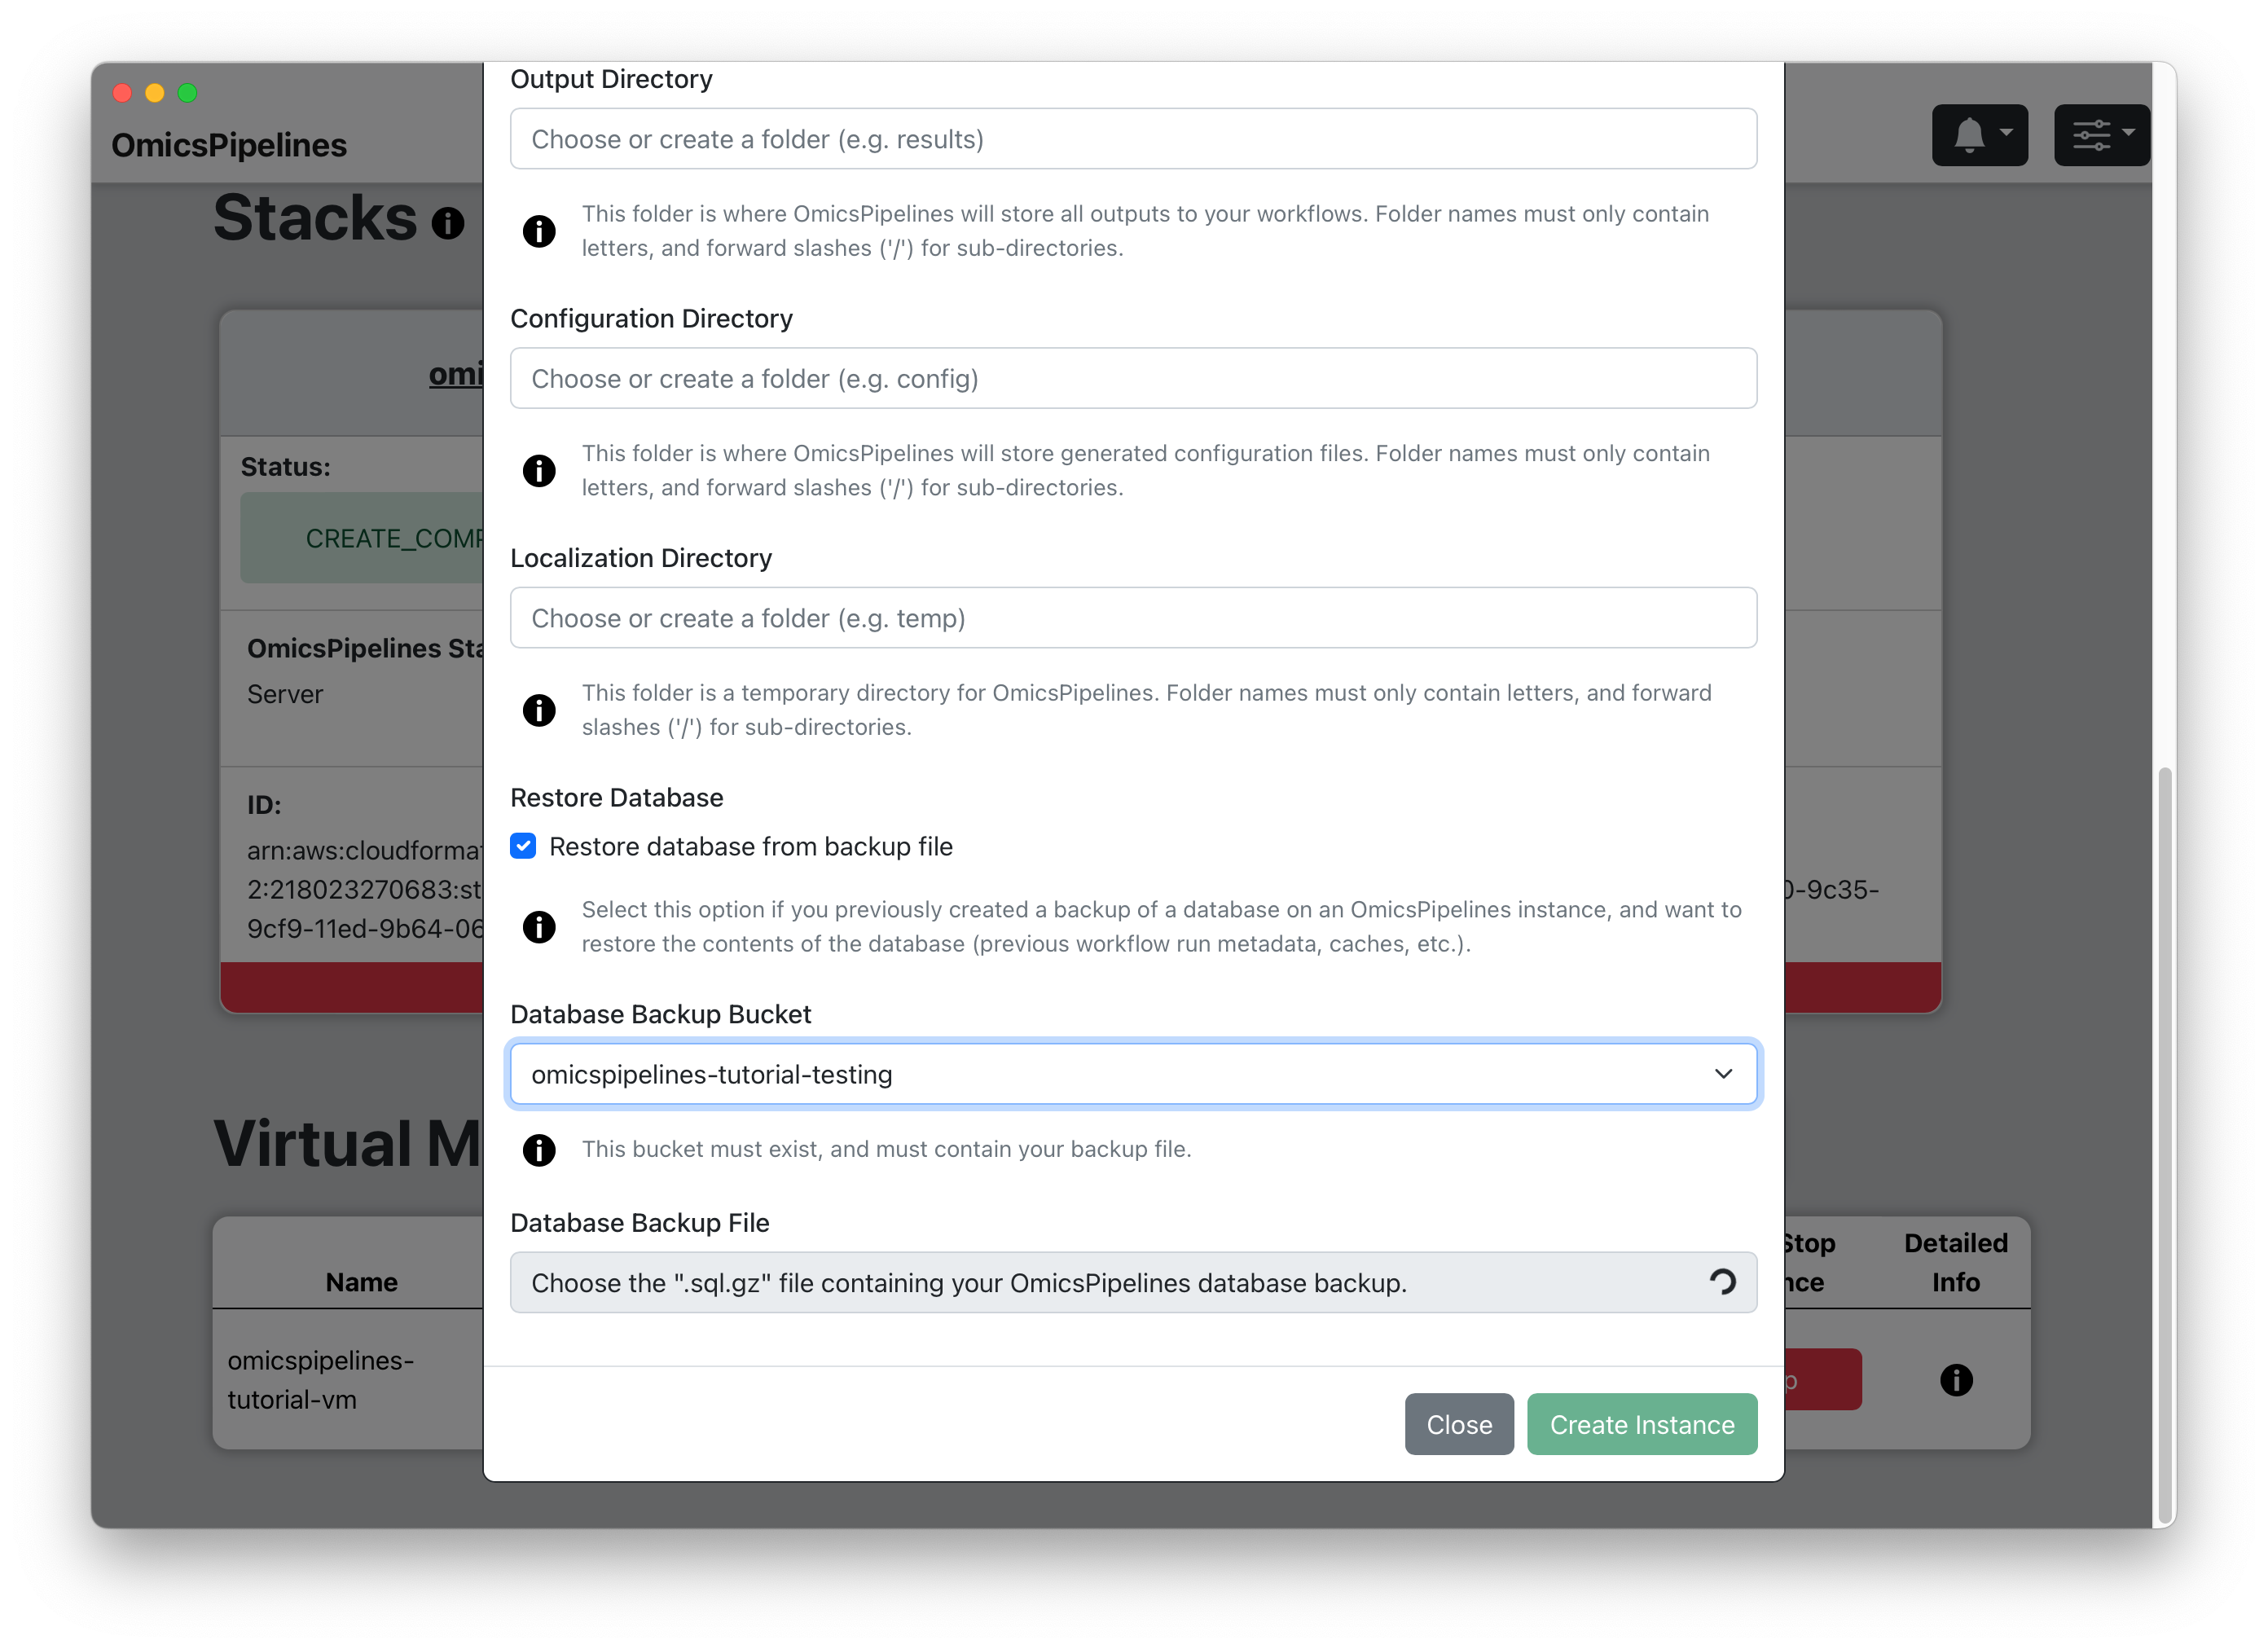
Output Directory - Choose a folder name for the outputs of the pipeline runs, such as
outputThis is the folder that will be created in the bucket you selected in the previous step. This folder will contain all the outputs of the pipelines, including all intermediate steps. The name of the folder can also be nested folder, e.g.folder1/folder2/output. If the bucket already exists, OmicsPipelines will suggest existing folders that you can use. -
Configuration Directory - Choose a folder name for the configuration files that OmicsPipelines generates, such as
config. This is used to allow you to easily re-run the same pipeline with the same configuration. OmicsPipelines also generates a file that you can use to run Cromwell pipelines without using OmicsPipelines. The name of the configuration folder can also be a nested folder, e.g.folder1/folder2/config. If the bucket already exists, OmicsPipelines will suggest existing folders that you can use. -
Localization Directory - Choose a folder name for temporary files generated during pipeline runs, such as
temp. This folder is rarely used, if ever, and will never contain any data that you need to keep. The name of the temporary folder can also be a nested folder, e.g.folder1/folder2/temp. If the bucket already exists, OmicsPipelines will suggest existing folders that you can use. -
(Optional) Restore Database - If you have a backup of your OmicsPipelines virtual machine's database, click on the checkbox to restore it to this virtual machine when it is created. This will allow you to restore your OmicsPipelines dashboard to a previous state. See the Manage Infrastructure page of the OmicsPipelines documentation for more information on backing up your OmicsPipelines virtual machine instance.

(Optional) Select Bucket - Select a bucket from the dropdown that contains a backup of your OmicsPipelines database.
(Optional) Select File - Select a file that contains a backup of your OmicsPipelines database. The list is automatically filtered to only show files that end with
.sql.gz, which is the file extension used by OmicsPipelines for database backups.
- Creating Instance - Click the "Create Instance" button to create your virtual machine. This will take a few minutes to complete. Once it is complete, you will receive a notification and the "Open Connection" button will be enabled.
If you are creating a new bucket, it may take a few minutes for the bucket to be created. If you are restoring an OmicsPipelines virtual machine from a database backup, especially one that was especially large, it will take a few minutes for the database to be restored. You may still connect to your virtual machine while these processes are running, but you may not see the complete list of your previous pipelines.